06 组件基础和组件注册
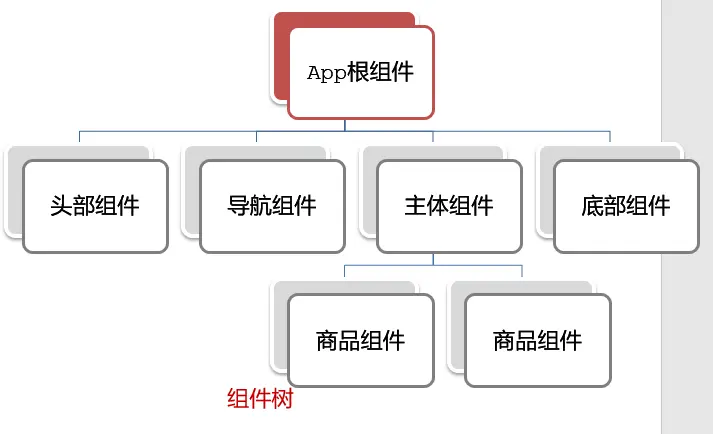
根组件 App.vue
根组件介绍
- 整个应用最上层的组件,包裹所有普通小组件
组件由三部分构成
三部分构成
template:结构(有且只能一个根元素)script: js 逻辑style:样式 (可支持 less,需要装包)
vue<template></template> <script></script> <style lang="less"></style>让组件支持 less
- style 标签,
lang="less"开启 less 功能 - 装包:
yarn add less less-loader -D或者pnpm i less less-loader -D
- style 标签,
<template>
  <!-- template 里面只能有一个根元素 -->
  <!-- template 里面的内容最终会被渲染到 index.html 里面的 #app 里面 -->
  <div class="App">
    <div class="box" @click="alertFn"></div>
  </div>
</template>

<script>
// 导出的是当前组件的配置项
// 里面可以提供 data(特殊) methods computed watch 生命周期八大钩子
export default {
  created () {
    console.log('我是 created')
  },
  methods: {
    alertFn () {
      alert('你好')
    },
  },
}
</script>

<style lang="less">
  /* 让 style 支持 less
   1. 给 style 加上 lang="less"
   2. 安装依赖包 less less-loader
      pnpm i less less-loader -D (开发依赖)
*/
  .App {
    width: 400px;
    height: 400px;
    background-color: pink;

    .box {
      width: 100px;
      height: 100px;
      background-color: skyblue;
    }
  }
</style>// 文件核心作用:导入 App.vue,基于 App.vue 创建结构渲染 index.html
// 1. 导入 Vue 核心包
import Vue from 'vue'
// 2. 导入 App.vue 根组件
import App from './App.vue'
// 提示:当前处于什么环境 (生产环境 / 开发环境)
Vue.config.productionTip = false
// 3. Vue 实例化,提供 render 方法 → 基于 App.vue 创建结构渲染 index.html
new Vue({
// el: '#app', 作用:和$mount('选择器') 作用一致,用于指定 Vue 所管理容器
// render: h => h(App),
render: (createElement) => {
// 基于 App 创建元素结构
return createElement(App)
},
}).$mount('#app')VSCode 快速创建 Vue 模板
Vetur自带 Customizable Scaffold Snippets,输入vue,回车即可快速创建 Vue 模板如果你安装的是
Volar插件,插件本身未包含 Snippets。可以使用 Snippet Generator 插件来生成 Snippets。
或者使用现成的 Snippets。(在 VSCode 的插件市场中搜索
vue snippets,安装一个即可。)
我选择的是 Vue Ecosystem Snippets。安装后输入
vbase:css或者vbase:less,回车即可快速创建 Vue 模板。
总结
App 组件包含哪三部分?
template、script、style
组件注册
官方文档:组件注册 — Vue.js
组件名
- 强烈推荐遵循 W3C 规范 中的自定义组件名 (字母全小写且必须包含一个连字符)。这会帮助你避免和当前以及未来的 HTML 元素相冲突。
- 你可以在 风格指南 中查阅到关于组件名的其它建议。
- 定义组件名的方式有两种:kebab-case (短横线分隔命名) 和 PascalCase(首字母大写命名) 。
使用 kebab-case
- 当使用 kebab-case (短横线分隔命名) 定义一个组件时,你也必须在引用这个自定义元素时使用 kebab-case,例如
<my-component-name>。
使用 PascalCase
- 当使用 PascalCase (首字母大写命名) 定义一个组件时,你在引用这个自定义元素时两种命名法都可以使用。也就是说
<my-component-name>和<MyComponentName>都是可接受的。 - 注意,尽管如此,直接在 DOM (即非字符串的模板) 中使用时只有 kebab-case 是有效的。
普通组件/基础组件
- 可能你的许多组件只是包裹了一个输入框或按钮之类的元素,是相对通用的。我们有时候会把它们称为 基础组件,它们会在各个组件中被频繁的用到。
普通组件局部注册
官方文档
特点:只能在注册的组件内使用
步骤
- 创建.vue 文件(三个组成部分)
- 在使用的组件内先导入再注册,最后使用
使用方式:当成 html 标签使用即可
<组件名></组件名>
语法
// 导入需要注册的组件
import 组件对象 from '.vue 文件路径';
import ComponentA from './components/ComponentA';

export default {
  // 局部注册
  components: {
    // 组件名:组件对象,
    ComponentA: ComponentA,
    ComponentA,
  },
};注意
在 ES2015+ 中,在对象中放一个类似 ComponentA 的变量名其实是 ComponentA: ComponentA 的缩写,即这个变量名同时是:
- 用在模板中的自定义元素的名称
- 包含了这个组件选项的变量名
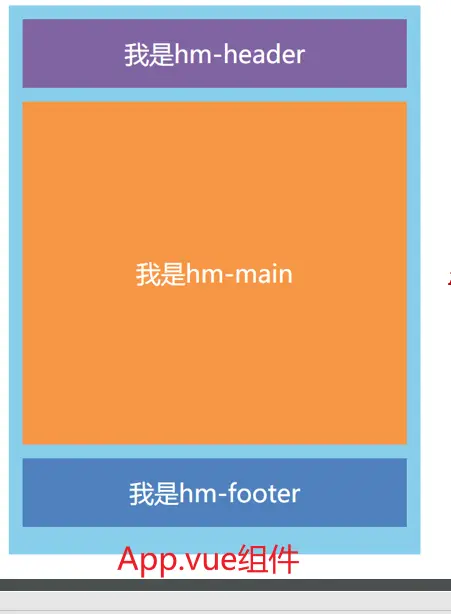
案例 使用组件方式完成布局
效果预览
<script>
export default {}
</script>

<template>
  <div class="hm-header">我是 hm-header</div>
</template>

<style lang="less">
  .hm-header {
    height: 100px;
    line-height: 100px;
    text-align: center;
    font-size: 30px;
    background-color: #8064a2;
    color: white;
  }
</style><script>
export default {}
</script>
<template>
<div class="hm-main">我是 hm-main</div>
</template>
<style lang="less">
.hm-main {
height: 400px;
line-height: 400px;
text-align: center;
font-size: 30px;
background-color: #f79646;
color: white;
margin: 20px 0;
}
</style><script>
export default {}
</script>
<template>
<div class="hm-footer">我是 hm-footer</div>
</template>
<style lang="css">
.hm-footer {
height: 100px;
line-height: 100px;
text-align: center;
font-size: 30px;
background-color: #4f81bd;
color: white;
}
</style><template>
<div class="App">
<!-- 头部组件 -->
<HmHeader></HmHeader>
<!-- 主体组件 -->
<HmMain></HmMain>
<!-- 底部组件 -->
<HmFooter></HmFooter>
<!-- 如果 HmFooter + tab 出不来 → 需要配置 vscode
设置中搜索 trigger on tab → 勾上
-->
</div>
</template>
<script>
import HmHeader from './components/HmHeader.vue'
import HmMain from './components/HmMain.vue'
import HmFooter from './components/HmFooter.vue'
export default {
components: {
// '组件名': 组件对象
HmHeader: HmHeader,
HmMain,
HmFooter,
},
}
</script>
<style>
.App {
width: 600px;
height: 700px;
background-color: #87ceeb;
margin: 0 auto;
padding: 20px;
}
</style>// 文件核心作用:导入 App.vue,基于 App.vue 创建结构渲染 index.html
// 1. 导入 Vue 核心包
import Vue from 'vue'
// 2. 导入 App.vue 根组件
import App from './App.vue'
// 提示:当前处于什么环境 (生产环境 / 开发环境)
Vue.config.productionTip = false
// 3. Vue 实例化,提供 render 方法 → 基于 App.vue 创建结构渲染 index.html
new Vue({
// el: '#app', 作用:和$mount('选择器') 作用一致,用于指定 Vue 所管理容器
// render: h => h(App),
render: (createElement) => {
// 基于 App 创建元素结构
return createElement(App)
},
}).$mount('#app')普通组件全局注册
官方文档:
特点:全局注册的组件,在项目的任何组件中都能使用
步骤
- 创建.vue 组件(三个组成部分)
main.js中进行全局注册
使用方式:当成 html 标签使用即可
<组件名></组件名>
语法
// 导入需要全局注册的组件
import HmButton from './components/HmButton';

// 调用 Vue.component 进行全局注册
// Vue.component('组件名', 组件对象)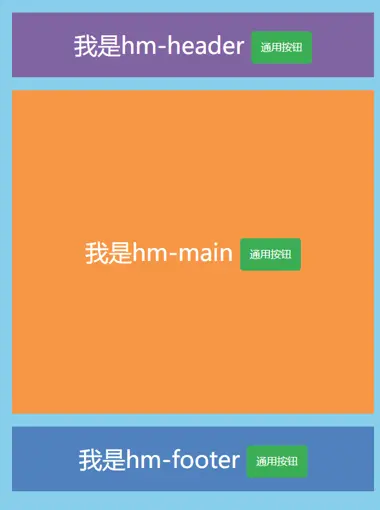
Vue.component('HmButton', HmButton);案例 局部组件中展示通用按钮
效果预览
<script>
export default {}
</script>

<template>
  <button class="hm-button">通用按钮</button>
</template>

<style>
  .hm-button {
    height: 50px;
    line-height: 50px;
    padding: 0 20px;
    background-color: #3bae56;
    border-radius: 5px;
    color: white;
    border: none;
    vertical-align: middle;
    cursor: pointer;
  }
</style><script>
// import HmButton from './HmButton.vue'
export default {
// 局部注册:注册的组件只能在当前的组件范围内使用
// components: {
// HmButton
// }
}
</script>
<template>
<div class="hm-header">
我是 hm-header
<HmButton></HmButton>
</div>
</template>
<style lang="less">
.hm-header {
height: 100px;
line-height: 100px;
text-align: center;
font-size: 30px;
background-color: #8064a2;
color: white;
}
</style><script>
export default {}
</script>
<template>
<div class="hm-main">
我是 hm-main
<HmButton></HmButton>
</div>
</template>
<style lang="less">
.hm-main {
height: 400px;
line-height: 400px;
text-align: center;
font-size: 30px;
background-color: #f79646;
color: white;
margin: 20px 0;
}
</style><script>
export default {}
</script>
<template>
<div class="hm-footer">
我是 hm-footer
<HmButton></HmButton>
</div>
</template>
<style lang="css">
.hm-footer {
height: 100px;
line-height: 100px;
text-align: center;
font-size: 30px;
background-color: #4f81bd;
color: white;
}
</style><template>
<div class="App">
<!-- 头部组件 -->
<HmHeader></HmHeader>
<!-- 主体组件 -->
<HmMain></HmMain>
<!-- 底部组件 -->
<HmFooter></HmFooter>
<!-- 如果 HmFooter + tab 出不来 → 需要配置 vscode
设置中搜索 trigger on tab → 勾上
-->
</div>
</template>
<script>
import HmHeader from './components/HmHeader.vue'
import HmMain from './components/HmMain.vue'
import HmFooter from './components/HmFooter.vue'
export default {
components: {
// '组件名': 组件对象
HmHeader: HmHeader,
HmMain,
HmFooter,
},
}
</script>
<style>
.App {
width: 600px;
height: 700px;
background-color: #87ceeb;
margin: 0 auto;
padding: 20px;
}
</style>// 文件核心作用:导入 App.vue,基于 App.vue 创建结构渲染 index.html
import Vue from 'vue'
import App from './App.vue'
// 编写导入的代码,往代码的顶部编写 (规范)
import HmButton from './components/HmButton'
Vue.config.productionTip = false
// 进行全局注册 → 在所有的组件范围内都能直接使用
// Vue.component(组件名,组件对象)
Vue.component('HmButton', HmButton)
// Vue 实例化,提供 render 方法 → 基于 App.vue 创建结构渲染 index.html
new Vue({
// render: h => h(App),
render: (createElement) => {
// 基于 App 创建元素结构
return createElement(App)
},
}).$mount('#app')总结
普通组件的注册使用
两种注册方式:局部注册和全局注册
使用:
<组件名></组件名>技巧:一般都用局部注册,如果发现确实是通用组件,再抽离到全局。
A 组件内部注册的局部组件能在 B 组件使用吗
- 一个组件内部注册的局部组件是不能直接在另一个组件中使用的。局部组件的作用域仅限于声明它的组件内部。
局部注册组件的步骤是什么
创建
.vue组件 (单文件组件)在使用的组件内导入,并局部注册
js// 在组件内 components: { 组件名:组件对象 }
使用组件时 应该按照什么命名法
单文件组件的文件名: 推荐使用 PascalCase(首字母大写的驼峰命名法)来命名单文件组件的文件。例如:
MyComponent.vue组件标签名: 推荐使用 kebab-case(小写字母,单词之间用短横线分隔)来命名组件标签名。在模板中使用组件时,标签名通常是小写的。例如:
<my-component></my-component>组件的选项名: 在注册组件时,推荐使用 PascalCase 来命名组件的选项。
js// 在父组件中注册 MyComponent components: { MyComponent, }
全局注册组件应该在哪个文件中注册以及语法是什么?
创建
.vue组件 (单文件组件)在
main.js内导入,通过Vue.component将该组件全局注册js// 在 main.js 内 import 组件名 from './path/to/组件名.vue'; // 调用 Vue.component 进行全局注册 Vue.component('组件名', 组件对象);
全局组件在项目中的任何一个组件中可不可以使用?
- 全局注册的组件可以在项目中的任何一个组件中使用。
- 全局组件是在应用程序启动时注册的,因此它们在整个应用程序的作用域内都是可用的,不受组件层级的限制。
综合案例 小兔鲜首页
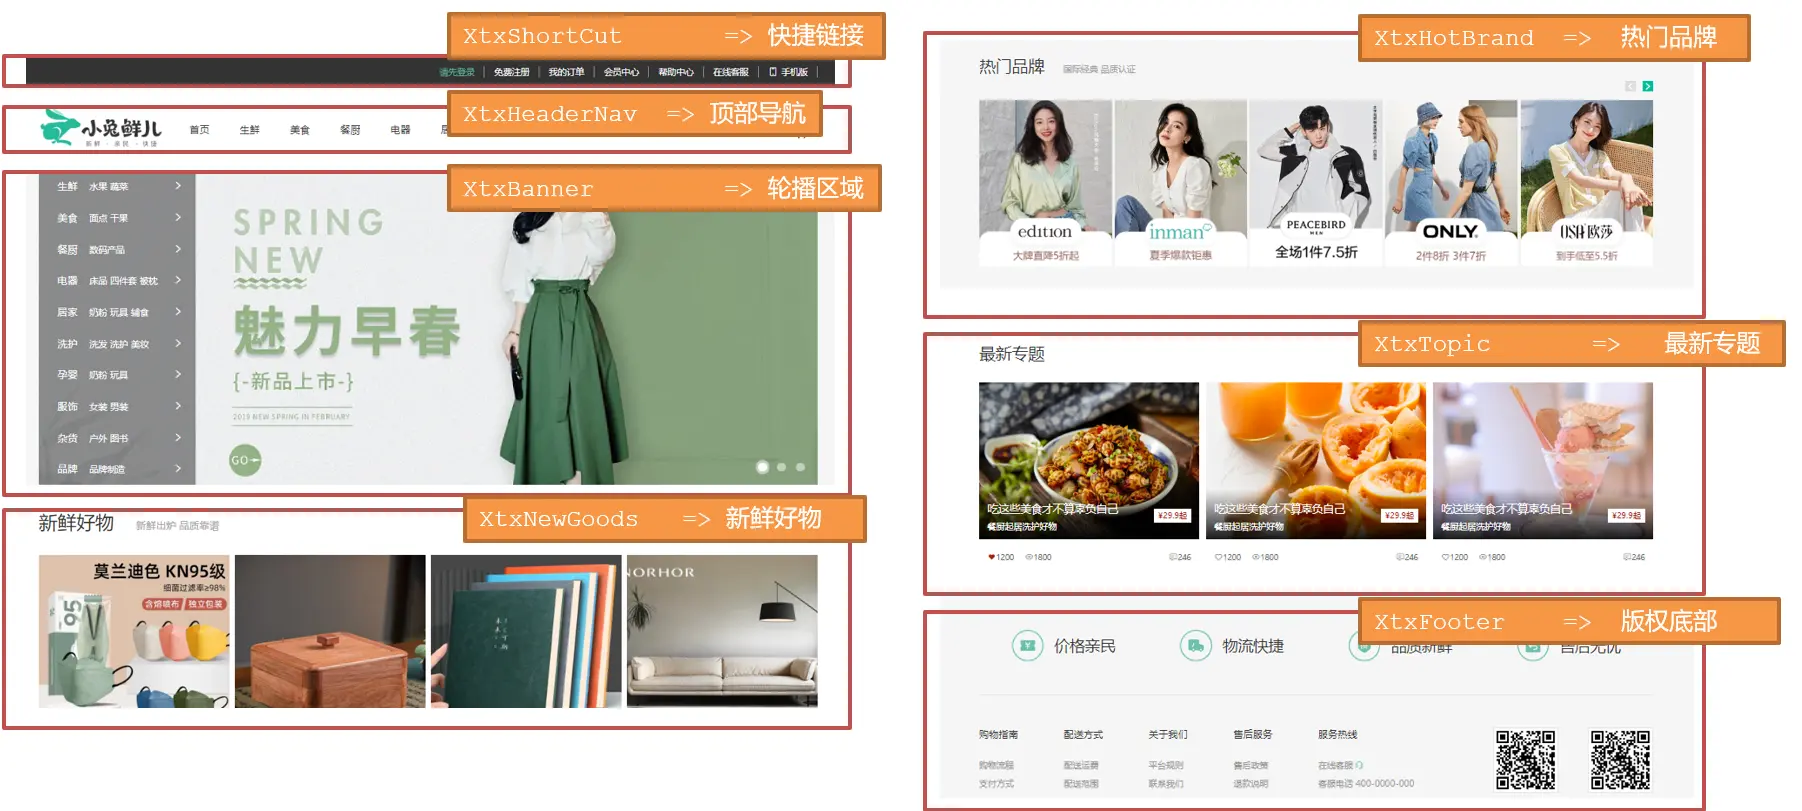
开发思路
分析页面,按模块拆分组件,搭架子 (局部或全局注册)
根据设计图,编写组件 html 结构 css 样式 (已准备好)
拆分封装通用小组件 (局部或全局注册)
将来 → 通过 js 动态渲染,实现功能
拆分组件
XtxShortCut=> 快捷链接XtxHeaderNav=> 顶部导航XtxBanner=> 轮播区域XtxNewGoods=> 新鲜好物XtxHotBrand=> 热门品牌XtxTopic=> 最新专题XtxFooter=> 版权底部
编写组件
- 将原来各个组件的 html 结构和 css 样式拷贝到对应的组件中
- html 结构复制到
template标签中 - css 样式复制到
style标签中
注册局部组件
- 在
App.vue中注册局部组件
// 导入需要注册的组件
import XtxShortCut from './components/XtxShortCut';
import XtxHeaderNav from './components/XtxHeaderNav';
import XtxBanner from './components/XtxBanner';
import XtxNewGoods from './components/XtxNewGoods';
import XtxHotBrand from './components/XtxHotBrand';
import XtxTopic from './components/XtxTopic';
import XtxFooter from './components/XtxFooter';

export default {
  // 局部注册
  components: {
    XtxShortCut,
    XtxHeaderNav,
    XtxBanner,
    XtxNewGoods,
    XtxHotBrand,
    XtxTopic,
    XtxFooter,
  },
};拆分封装通用小组件
我们发现有些组件里的信息是通用的,所以我们将其抽离出来封装成一个通用的组件。
- 新鲜好物
XtxNewGoods=> 通用组件BaseGoodsItem商品信息 - 热门品牌
XtxHotBrand=> 通用组件BaseBrandItem品牌信息 - 最新专题
XtxTopic=> 通用组件BaseTopicItem专题信息
- 新鲜好物
在
components目录下创建BaseGoodsItem.vue、BaseBrandItem.vue、BaseTopicItem.vue组件将对应的 html 结构和 css 样式拷贝到对应的组件中
在
main.js中全局注册通用组件js// 导入需要注册的组件 import BaseGoodsItem from './components/BaseGoodsItem'; import BaseBrandItem from './components/BaseBrandItem'; import BaseTopicItem from './components/BaseTopicItem'; // 调用 Vue.component 进行全局注册 Vue.component('BaseGoodsItem', BaseGoodsItem); Vue.component('BaseBrandItem', BaseBrandItem); Vue.component('BaseTopicItem', BaseTopicItem);在父组件(
XtxNewGoods、XtxHotBrand、XtxTopic)中使用v-for循环生成多个子组件。vue<BaseGoodsItem v-for="item in 4" :key="item"></BaseGoodsItem> <BaseBrandItem v-for="item in 5" :key="item"></BaseBrandItem> <BaseTopicItem v-for="item in 3" :key="item"></BaseTopicItem>
相关代码
❯ tre ./src
./src
├── App.vue
├── components
│   ├── BaseBrandItem.vue
│   ├── BaseGoodsItem.vue
│   ├── BaseTopicItem.vue
│   ├── XtxBanner.vue
│   ├── XtxFooter.vue
│   ├── XtxHeaderNav.vue
│   ├── XtxHotBrand.vue
│   ├── XtxNewGoods.vue
│   ├── XtxShortCut.vue
│   └── XtxTopic.vue
└── main.js普通组件全局注册
<script lang="ts" setup></script>

<template>
  <li class="base-brand-item">
    <a href="#">
      <img src="@/assets/images/hot1.png" alt="" />
    </a>
  </li>
</template>

<style lang="css" scoped>
.base-brand-item {
  width: 244px;
  height: 306px;
}
</style><script lang="ts" setup></script>
<template>
<li class="base-goods-item">
<a href="#">
<div class="pic">
<img src="@/assets/images/goods1.png" alt="" />
</div>
<div class="txt">
<h4>KN95 级莫兰迪色防护口罩</h4>
<p>¥ <span>79</span></p>
</div>
</a>
</li>
</template>
<style lang="css" scoped>
.base-goods-item {
width: 304px;
height: 404px;
background-color: #eef9f4;
}
.base-goods-item {
display: block;
}
.base-goods-item .pic {
width: 304px;
height: 304px;
}
.base-goods-item .txt {
text-align: center;
}
.base-goods-item h4 {
margin-top: 17px;
margin-bottom: 8px;
font-size: 20px;
}
.base-goods-item p {
font-size: 18px;
color: #aa2113;
}
.base-goods-item p span {
font-size: 22px;
}
</style><script lang="ts" setup></script>
<template>
<li class="base-topic-item">
<a href="#">
<div class="pic">
<img src="@/assets/images/topic1.png" alt="" />
<div class="info">
<div class="left">
<h5>吃这些美食才不算辜负自己</h5>
<p>餐厨起居洗护好物</p>
</div>
<div class="right">¥<span>29.9</span>起</div>
</div>
</div>
<div class="txt">
<div class="left">
<p>
<span class="iconfont icon-favorites-fill red"></span>
<i>1200</i>
</p>
<p>
<span class="iconfont icon-browse"></span>
<i>1800</i>
</p>
</div>
<div class="right">
<span class="iconfont icon-comment"></span>
<i>246</i>
</div>
</div>
</a>
</li>
</template>
<style lang="css">
.base-topic-item {
width: 405px;
height: 355px;
}
.base-topic-item .pic {
position: relative;
width: 405px;
height: 288px;
}
.base-topic-item .txt {
display: flex;
justify-content: space-between;
padding: 0 15px;
height: 67px;
line-height: 67px;
color: #666;
font-size: 14px;
}
.base-topic-item .txt .left {
display: flex;
}
.base-topic-item .txt .left p {
margin-right: 20px;
}
.base-topic-item .txt .left .red {
color: #aa2113;
}
.base-topic-item .info {
position: absolute;
left: 0;
bottom: 0;
display: flex;
justify-content: space-between;
padding: 0 15px;
width: 100%;
height: 90px;
background-image: linear-gradient(
180deg,
rgba(137, 137, 137, 0) 0%,
rgba(0, 0, 0, 0.9) 100%
);
}
.base-topic-item .info .left {
padding-top: 20px;
color: #fff;
}
.base-topic-item .info .left h5 {
margin-bottom: 5px;
font-size: 20px;
}
.base-topic-item .info .right {
margin-top: 35px;
padding: 0 7px;
height: 25px;
line-height: 25px;
background-color: #fff;
color: #aa2113;
font-size: 15px;
}
</style>import Vue from 'vue'
import App from './App.vue'
import './styles/base.css' // css 样式重置
import './styles/common.css' // 公共全局样式
import './assets/iconfont/iconfont.css' // 字体图标的样式
// import './styles/index.css' // 页面样式 (现在已经分组件写了,每个组件都有自己的样式,所以这个文件可以删除了)
// 导入需要注册的组件
import BaseGoodsItem from './components/BaseGoodsItem'
import BaseBrandItem from './components/BaseBrandItem'
import BaseTopicItem from './components/BaseTopicItem'
// 调用 Vue.component 进行全局注册
Vue.component('BaseGoodsItem', BaseGoodsItem)
Vue.component('BaseBrandItem', BaseBrandItem)
Vue.component('BaseTopicItem', BaseTopicItem)
Vue.config.productionTip = false
new Vue({
render: (h) => h(App),
}).$mount('#app')普通组件局部注册
<script lang="ts" setup></script>

<template>
  <!-- 快捷链接  -->
  <div class="shortcut">
    <div class="wrapper">
      <ul>
        <li><a href="#" class="login">请先登录</a></li>
        <li><a href="#">免费注册</a></li>
        <li><a href="#">我的订单</a></li>
        <li><a href="#">会员中心</a></li>
        <li><a href="#">帮助中心</a></li>
        <li><a href="#">在线客服</a></li>
        <li>
          <a href="#"><span class="iconfont icon-mobile-phone"></span>手机版</a>
        </li>
      </ul>
    </div>
  </div>
</template>

<style lang="less" scoped>
.shortcut {
  height: 52px;
  line-height: 52px;
  background-color: #333;
}

.shortcut .wrapper {
  display: flex;
  justify-content: flex-end;
}

.shortcut ul {
  display: flex;
}

.shortcut a {
  padding: 0 15px;
  border-right: 1px solid #999;
  color: #fff;
  font-size: 14px;
  line-height: 14px;
}

.shortcut .login {
  color: #5eb69c;
}

.shortcut .icon-mobile-phone {
  margin-right: 5px;
}
</style><script lang="ts" setup></script>
<template>
<!-- 头部导航 -->
<div class="header wrapper">
<!-- logo -->
<div class="logo">
<h1>
<a href="#">小兔鲜儿</a>
</h1>
</div>
<!-- 导航 -->
<div class="nav">
<ul>
<li><a href="#">首页</a></li>
<li><a href="#">生鲜</a></li>
<li><a href="#">美食</a></li>
<li><a href="#">餐厨</a></li>
<li><a href="#">电器</a></li>
<li><a href="#">居家</a></li>
<li><a href="#">洗护</a></li>
<li><a href="#">孕婴</a></li>
<li><a href="#">服装</a></li>
</ul>
</div>
<!-- 搜索 -->
<div class="search">
<span class="iconfont icon-search"></span>
<input type="text" placeholder="搜一搜" />
</div>
<!-- 购物车 -->
<div class="cart">
<span class="iconfont icon-cart-full"></span>
<i>2</i>
</div>
</div>
</template>
<style lang="less" scoped>
.header {
display: flex;
margin: 22px auto;
}
.header .logo {
margin-right: 40px;
width: 200px;
height: 88px;
background-color: pink;
}
.header .logo a {
display: block;
width: 200px;
height: 88px;
background-image: url(~@/assets/images/logo.png);
font-size: 0;
}
.header .nav {
margin-top: 33px;
margin-right: 27px;
}
.header .nav ul {
display: flex;
}
.header .nav li {
margin-right: 48px;
}
.header .nav a {
display: block;
height: 34px;
}
.header .nav a:hover {
border-bottom: 2px solid #5eb69c;
}
.header .search {
display: flex;
margin-right: 45px;
margin-top: 33px;
width: 170px;
height: 34px;
border-bottom: 2px solid #f4f4f4;
}
.header .search .icon-search {
margin-right: 8px;
font-size: 20px;
color: #999;
}
.header .search input {
flex: 1;
}
.header .search input::placeholder {
color: #ccc;
}
.header .cart {
position: relative;
margin-top: 33px;
}
.header .cart .icon-cart-full {
font-size: 24px;
}
.header .cart i {
position: absolute;
/* right: -5px; */
left: 15px;
top: 0;
padding: 0 5px;
height: 15px;
background-color: #e26237;
border-radius: 7px;
font-size: 12px;
color: #fffefe;
line-height: 15px;
}
</style><script lang="ts" setup></script>
<template>
<!-- 轮播区域 -->
<div class="banner">
<div class="wrapper">
<!-- 图 -->
<ul class="pic">
<li>
<a href="#"><img src="@/assets/images/banner1.png" alt="" /></a>
</li>
<li>
<a href="#"><img src="@/assets/images/banner1.png" alt="" /></a>
</li>
</ul>
<!-- 侧导航 -->
<div class="subnav">
<ul>
<li>
<div>
<span><a href="#">生鲜</a></span>
<span><a href="#">水果</a><a href="#">蔬菜</a></span>
</div>
<i class="iconfont icon-arrow-right-bold"></i>
</li>
<li>
<div>
<span><a href="#">美食</a></span>
<span><a href="#">面点</a><a href="#">干果</a></span>
</div>
<i class="iconfont icon-arrow-right-bold"></i>
</li>
<li>
<div>
<span><a href="#">餐厨</a></span>
<span><a href="#">数码产品</a></span>
</div>
<i class="iconfont icon-arrow-right-bold"></i>
</li>
<li>
<div>
<span><a href="#">电器</a></span>
<span
><a href="#">床品</a><a href="#">四件套</a
><a href="#">被枕</a></span
>
</div>
<i class="iconfont icon-arrow-right-bold"></i>
</li>
<li>
<div>
<span><a href="#">居家</a></span>
<span
><a href="#">奶粉</a><a href="#">玩具</a
><a href="#">辅食</a></span
>
</div>
<i class="iconfont icon-arrow-right-bold"></i>
</li>
<li>
<div>
<span><a href="#">洗护</a></span>
<span
><a href="#">洗发</a><a href="#">洗护</a
><a href="#">美妆</a></span
>
</div>
<i class="iconfont icon-arrow-right-bold"></i>
</li>
<li>
<div>
<span><a href="#">孕婴</a></span>
<span><a href="#">奶粉</a><a href="#">玩具</a></span>
</div>
<i class="iconfont icon-arrow-right-bold"></i>
</li>
<li>
<div>
<span><a href="#">服饰</a></span>
<span><a href="#">女装</a><a href="#">男装</a></span>
</div>
<i class="iconfont icon-arrow-right-bold"></i>
</li>
<li>
<div>
<span><a href="#">杂货</a></span>
<span><a href="#">户外</a><a href="#">图书</a></span>
</div>
<i class="iconfont icon-arrow-right-bold"></i>
</li>
<li>
<div>
<span><a href="#">品牌</a></span>
<span><a href="#">品牌制造</a></span>
</div>
<i class="iconfont icon-arrow-right-bold"></i>
</li>
</ul>
</div>
<!-- 指示器 -->
<ol>
<li class="current"><i></i></li>
<li><i></i></li>
<li><i></i></li>
</ol>
</div>
</div>
</template>
<style lang="less" scoped>
.banner {
height: 500px;
background-color: #f5f5f5;
}
.banner .wrapper {
position: relative;
overflow: hidden;
}
.banner .pic {
display: flex;
width: 3720px;
height: 500px;
}
.banner .pic li {
width: 1240px;
height: 500px;
}
.banner .subnav {
position: absolute;
left: 0;
top: 0;
width: 250px;
height: 500px;
background-color: rgba(0, 0, 0, 0.42);
}
.banner .subnav li {
display: flex;
justify-content: space-between;
padding: 0 20px 0 30px;
height: 50px;
line-height: 50px;
}
.banner .subnav a,
.banner .subnav i {
color: #fff;
}
.banner .subnav li span:nth-child(1) {
margin-right: 14px;
}
.banner .subnav li span:nth-child(2) a {
margin-right: 5px;
}
.banner .subnav li span:nth-child(2) a {
font-size: 14px;
}
.banner .subnav li:hover {
background-color: #00be9a;
}
.banner ol {
position: absolute;
right: 17px;
bottom: 17px;
display: flex;
}
.banner ol li {
cursor: pointer;
margin-left: 8px;
padding: 4px;
width: 22px;
height: 22px;
background-color: transparent;
border-radius: 50%;
}
.banner ol li i {
display: block;
width: 14px;
height: 14px;
background-color: rgba(255, 255, 255, 0.5);
border-radius: 50%;
}
.banner ol .current {
background-color: rgba(255, 255, 255, 0.5);
}
.banner ol .current i {
background-color: #fff;
}
</style><script lang="ts" setup></script>
<template>
<!-- 新鲜好物 -->
<div class="goods wrapper">
<div class="title">
<div class="left">
<h3>新鲜好物</h3>
<p>新鲜出炉 品质靠谱</p>
</div>
<div class="right">
<a href="#" class="more"
>查看全部<span class="iconfont icon-arrow-right-bold"></span
></a>
</div>
</div>
<div class="bd">
<ul>
<BaseGoodsItem v-for="item in 4" :key="item"></BaseGoodsItem>
</ul>
</div>
</div>
</template>
<style lang="less" scoped>
.goods .bd ul {
display: flex;
justify-content: space-between;
}
</style><script lang="ts" setup></script>
<template>
<!-- 热门品牌 -->
<div class="hot">
<div class="wrapper">
<div class="title">
<div class="left">
<h3>热门品牌</h3>
<p>国际经典 品质认证</p>
</div>
<div class="button">
<a href="#"><i class="iconfont icon-arrow-left-bold"></i></a>
<a href="#"><i class="iconfont icon-arrow-right-bold"></i></a>
</div>
</div>
<div class="bd">
<ul>
<BaseBrandItem v-for="item in 5" :key="item"></BaseBrandItem>
</ul>
</div>
</div>
</div>
</template>
<style lang="less" scoped>
.hot {
margin-top: 60px;
padding-bottom: 40px;
overflow: hidden;
background-color: #f5f5f5;
}
.hot .title {
position: relative;
margin-bottom: 40px;
}
.hot .button {
display: flex;
position: absolute;
right: 0;
top: 47px;
}
.hot .button a {
display: block;
width: 20px;
height: 20px;
background-color: #ddd;
text-align: center;
line-height: 20px;
color: #fff;
}
.hot .button a:nth-child(2) {
margin-left: 12px;
background-color: #00be9a;
}
.hot .bd ul {
display: flex;
justify-content: space-between;
}
</style><script lang="ts" setup></script>
<template>
<!-- 最新专题 -->
<div class="topic wrapper">
<div class="title">
<div class="left">
<h3>最新专题</h3>
</div>
<div class="right">
<a href="#" class="more"
>查看全部<span class="iconfont icon-arrow-right-bold"></span
></a>
</div>
</div>
<div class="topic_bd">
<ul>
<BaseTopicItem v-for="item in 3" :key="item"></BaseTopicItem>
</ul>
</div>
</div>
</template>
<style lang="less" scoped>
.topic {
padding-top: 60px;
margin-bottom: 40px;
}
.topic_bd ul {
display: flex;
justify-content: space-between;
}
</style><script lang="ts" setup></script>
<template>
<!-- 版权底部 -->
<div class="footer">
<div class="wrapper">
<div class="service">
<ul>
<li>
<span></span>
<p>价格亲民</p>
</li>
<li>
<span></span>
<p>物流快捷</p>
</li>
<li>
<span></span>
<p>品质新鲜</p>
</li>
<li>
<span></span>
<p>售后无忧</p>
</li>
</ul>
</div>
<div class="help">
<div class="left">
<dl>
<dt>购物指南</dt>
<dd><a href="#">购物流程</a></dd>
<dd><a href="#">支付方式</a></dd>
<dd><a href="#">售后规则</a></dd>
</dl>
<dl>
<dt>配送方式</dt>
<dd><a href="#">配送运费</a></dd>
<dd><a href="#">配送范围</a></dd>
<dd><a href="#">配送时间</a></dd>
</dl>
<dl>
<dt>关于我们</dt>
<dd><a href="#">平台规则</a></dd>
<dd><a href="#">联系我们</a></dd>
<dd><a href="#">问题反馈</a></dd>
</dl>
<dl>
<dt>售后服务</dt>
<dd><a href="#">售后政策</a></dd>
<dd><a href="#">退款说明</a></dd>
<dd><a href="#">取消订单</a></dd>
</dl>
<dl>
<dt>服务热线</dt>
<dd>
<a href="#"
>在线客服<span class="iconfont icon-customer-service"></span
></a>
</dd>
<dd><a href="#">客服电话 400-0000-000</a></dd>
<dd><a href="#">工作时间 周一至周日 8:00-18:00</a></dd>
</dl>
</div>
<div class="right">
<ul>
<li>
<div><img src="@/assets/images/wechat.png" alt="" /></div>
<p>微信公众号</p>
</li>
<li>
<div><img src="@/assets/images/app.png" alt="" /></div>
<p>APP 下载二维码</p>
</li>
</ul>
</div>
</div>
<div class="copyright">
<p>
<a href="#">关于我们</a>|<a href="#">帮助中心</a>|<a href="#"
>售后服务</a
>|<a href="#">配送与验收</a>|<a href="#">商务合作</a>|<a href="#"
>搜索推荐</a
>|<a href="#">友情链接</a>
</p>
<p>CopyRight © 小兔鲜</p>
</div>
</div>
</div>
</template>
<style lang="less" scoped>
.footer {
height: 580px;
background-color: #f5f5f5;
}
.footer .service {
padding: 60px 0;
height: 180px;
border-bottom: 1px solid #e8e8e8;
}
.footer .service ul {
display: flex;
justify-content: space-around;
}
.footer .service li {
display: flex;
line-height: 58px;
}
.footer .service span {
display: block;
margin-right: 20px;
width: 58px;
height: 58px;
background-image: url(~@/assets/images/sprite.png);
}
.footer .service li:nth-child(2) span {
background-position: 0 -58px;
}
.footer .service li:nth-child(3) span {
background-position: 0 -116px;
}
.footer .service li:nth-child(4) span {
background-position: 0 -174px;
}
.footer .service p {
font-size: 28px;
}
.footer .help {
display: flex;
justify-content: space-between;
margin-top: 60px;
}
.footer .help .left {
display: flex;
}
.footer .help .left dl {
margin-right: 84px;
}
.footer .help .left dt {
margin-bottom: 30px;
font-size: 18px;
}
.footer .help .left dd {
margin-bottom: 10px;
}
.footer .help .left dd a {
color: #969696;
}
.footer .help .right ul {
display: flex;
align-items: flex-start;
}
.footer .help .right li:nth-child(1) {
margin-right: 55px;
text-align: center;
}
.footer .help .right div {
margin-bottom: 10px;
width: 120px;
height: 120px;
color: #969696;
}
.icon-customer-service {
margin-left: 3px;
color: #00be9a;
}
.copyright {
margin-top: 100px;
text-align: center;
color: #a1a1a1;
}
.copyright p {
margin-bottom: 15px;
}
.copyright a {
margin: 0 10px;
color: #a1a1a1;
}
</style><template>
<div class="App">
<!-- 快捷链接 -->
<XtxShortCut></XtxShortCut>
<!-- 顶部导航 -->
<XtxHeaderNav></XtxHeaderNav>
<!-- 轮播区域 -->
<XtxBanner></XtxBanner>
<!-- 新鲜好物 -->
<XtxNewGoods></XtxNewGoods>
<!-- 热门品牌 -->
<XtxHotBrand></XtxHotBrand>
<!-- 最新专题 -->
<XtxTopic></XtxTopic>
<!-- 版权底部 -->
<XtxFooter></XtxFooter>
</div>
</template>
<script>
import XtxShortCut from './components/XtxShortCut.vue'
import XtxHeaderNav from './components/XtxHeaderNav.vue'
import XtxBanner from './components/XtxBanner.vue'
import XtxNewGoods from './components/XtxNewGoods.vue'
import XtxHotBrand from './components/XtxHotBrand.vue'
import XtxTopic from './components/XtxTopic.vue'
import XtxFooter from './components/XtxFooter.vue'
export default {
// 注册局部组件
components: {
XtxShortCut,
XtxHeaderNav,
XtxBanner,
XtxNewGoods,
XtxHotBrand,
XtxTopic,
XtxFooter,
},
}
</script>
<style scoped></style>scoped 解决样式冲突
默认情况
写在组件中的样式会 全局生效 → 因此很容易造成多个组件之间的样式冲突问题。
- 全局样式: 默认组件中的样式会作用到全局,任何一个组件中都会受到此样式的影响
- 局部样式: 可以给组件加上 scoped 属性,可以 让样式只作用于当前组件
scoped 原理
scoped 会在当前组件中的 每个标签 上加上 唯一的属性
data-v-hash,不同组件中的属性名不同在 style 标签中,会自动加上 属性选择器
div[data-v-hash],来保证样式只作用于当前组件但是 scoped 会导致 样式不能作用于子组件,因此需要使用
>>>或者/deep/来穿透 scopedhtml<style scoped> div { color: red; } div h2 { color: green; } div >>> p { color: blue; } </style>上面的代码会被编译成:
cssdiv[data-v-xxxx] { color: red; } div[data-v-xxxx] h2 { color: green; } div[data-v-xxxx] p { color: blue; }
最终效果:必须是当前组件的元素, 才会有这个自定义属性,才会被这个样式作用到

<template>
  <div class="base-one">BaseOne</div>
</template>

<script>
export default {}
</script>

<style scoped>
  /*
    1. style 中的样式 默认是作用到全局的
    2. 加上 scoped 可以让样式变成局部样式

        组件都应该有独立的样式,推荐加 scoped(原理)
        -----------------------------------------------------
        scoped 原理:
        1. 给当前组件模板的所有元素,都会添加上一个自定义属性
            data-v-hash 值
            data-v-5f6a9d56  用于区分开不通的组件
        2.css 选择器后面,被自动处理,添加上了属性选择器
            div[data-v-5f6a9d56]
*/
  div {
    border: 3px solid blue;
    margin: 30px;
  }
</style><template>
<div class="base-two">BaseTwo</div>
</template>
<script>
export default {}
</script>
<style scoped>
div {
border: 3px solid red;
margin: 30px;
}
</style><template>
<div class="base-three">BaseThree</div>
</template>
<script>
export default {}
</script>
<style>
div {
border: 3px solid #00f2ff;
margin: 30px;
}
</style><template>
<div id="app">
<BaseOne></BaseOne>
<BaseTwo></BaseTwo>
<BaseThree></BaseThree>
</div>
</template>
<script>
import BaseOne from './components/BaseOne'
import BaseTwo from './components/BaseTwo'
import BaseThree from './components/BaseThree'
export default {
name: 'App',
components: {
BaseOne,
BaseTwo,
BaseThree,
},
}
</script>
<style lang="css">
/* 因为没有写 scoped,所以 BaseThree 的样式会作用到 App 组件(style 中的样式 默认是作用到全局的) */
</style>import Vue from 'vue'
import App from './App.vue'
Vue.config.productionTip = false
new Vue({
render: h => h(App),
}).$mount('#app')总结
style 的默认样式是作用到哪里的?
- 默认组件中的样式会作用到全局,任何一个组件中都会受到此样式的影响
scoped 的作用是什么?
- Vue.js 使用了一种叫做 scoped styles 的技术,它通过在
style标签上添加scoped属性来限制样式的作用范围。 - 给组件加上 scoped 属性,可以 让样式只作用于当前组件,而不会污染全局样式。
- Vue.js 使用了一种叫做 scoped styles 的技术,它通过在
style 中推不推荐加
scoped?是否推荐使用
scoped取决于你的项目需求和个人团队的偏好。使用
scoped的情况:- 组件隔离性要求高: 如果你希望组件的样式在局部生效,不会影响到其他组件,那么使用
scoped是很有帮助的,它可以避免全局样式的冲突。 - 避免全局样式冲突: 当项目较大,有多个开发者协同工作时,使用
scoped可以避免全局样式冲突和命名空间问题。 - 样式仅在当前组件内有效: 如果你希望样式只在当前组件内生效,而不波及到其他地方,可以使用
scoped。
- 组件隔离性要求高: 如果你希望组件的样式在局部生效,不会影响到其他组件,那么使用
不使用
scoped的情况:- 全局样式需求: 如果你希望样式对整个应用程序或多个组件起作用,而不仅仅是当前组件,那么不使用
scoped更为合适。 - 维护性和一致性: 在某些情况下,全局样式可能更易于维护和确保一致性,尤其是对于一些通用的样式规范。
- 团队约定: 根据团队的约定和项目的实际需求,可能会选择是否使用
scoped。
- 全局样式需求: 如果你希望样式对整个应用程序或多个组件起作用,而不仅仅是当前组件,那么不使用
data 必须是一个函数
data: API — Vue.js- 类型:
Object | Function - 限制:组件的定义只接受
function。
data 为什么要写成函数
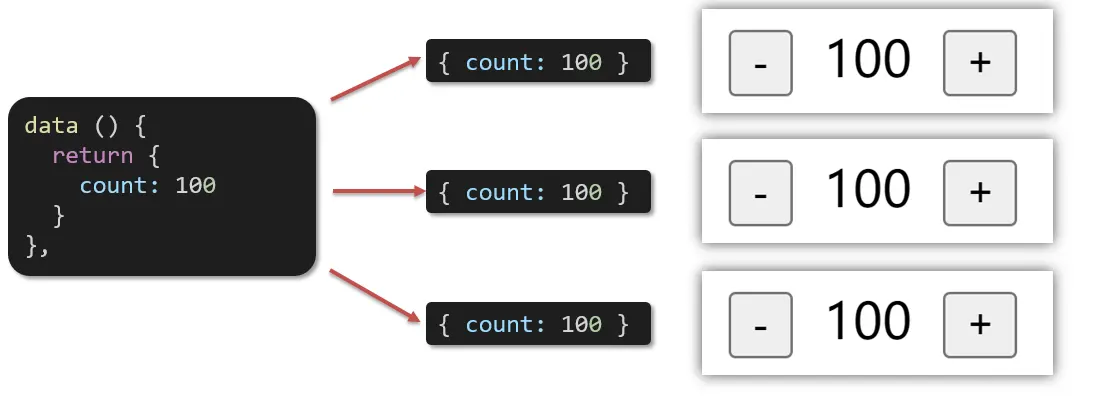
- 一个组件的 data 选项必须是一个函数。目的是为了:保证每个组件实例,维护独立的一份数据对象。
- 每次创建新的组件实例,都会新执行一次 data 函数,得到一个新对象。
官方解释
Vue 实例的数据对象。Vue 会递归地把 data 的 property 转换为 getter/setter,从而让 data 的 property 能够响应数据变化。对象必须是纯粹的对象 (含有零个或多个的 key/value 对):浏览器 API 创建的原生对象,原型上的 property 会被忽略。大概来说,data 应该只能是数据 - 不推荐观察拥有状态行为的对象。
一旦观察过,你就无法在根数据对象上添加响应式 property。因此推荐在创建实例之前,就声明所有的根级响应式 property。
实例创建之后,可以通过
vm.$data访问原始数据对象。Vue 实例也代理了 data 对象上所有的 property,因此访问vm.a等价于访问vm.$data.a。以
_或$开头的 property 不会被 Vue 实例代理,因为它们可能和 Vue 内置的 property、API 方法冲突。你可以使用例如vm.$data._property的方式访问这些 property。当一个组件被定义,
data必须声明为返回一个初始数据对象的函数,因为组件可能被用来创建多个实例。如果data仍然是一个纯粹的对象,则所有的实例将共享引用同一个数据对象!通过提供data函数,每次创建一个新实例后,我们能够调用data函数,从而返回初始数据的一个全新副本数据对象。如果需要,可以通过将
vm.$data传入JSON.parse(JSON.stringify(…))得到深拷贝的原始数据对象。
<template>
  <div class="base-count">
    <button @click="count--">-</button>
    <span>{{ count }}</span>
    <button @click="count++">+</button>
  </div>
</template>

<script>
export default {
  // data() {
  //   console.log('函数执行了')
  //   // 直接声明为对象,那么该对象会在组件的所有实例之间共享
  //   // 这可能会导致一个组件实例中的状态影响其他实例
  //   return {
  //     count: 100,
  //   }
  // },
  data: function () {
    console.log('函数执行了')
    // 每次创建组件实例时,都会调用该函数
    // 返回一个新的数据对象,这样每个实例都拥有独立的数据
    return {
      count: 100,
    }
  },
}
</script>

<style>
  .base-count {
    margin: 20px;
  }
</style><template>
<div id="app">
<baseCount></baseCount>
<baseCount></baseCount>
<baseCount></baseCount>
</div>
</template>
<script>
import BaseCount from './components/BaseCount'
export default {
name: 'App',
components: {
BaseCount,
},
}
</script>
<style lang="css"></style>import Vue from 'vue'
import App from './App.vue'
Vue.config.productionTip = false
new Vue({
render: h => h(App),
}).$mount('#app')总结
data 写成函数的目的是什么?
- 将
data定义为函数有助于维护组件的隔离性,确保每个组件实例都拥有独立的数据状态。 - 在 Vue.js 组件中,如果将
data直接声明为对象,那么该对象会在组件的所有实例之间共享。这可能会导致一个组件实例中的状态影响其他实例,从而引起不可预料的问题。为了解决这个问题,Vue.js 推荐将data定义为一个返回对象的函数。 - 将
data定义为函数的主要目的是确保每个组件实例都有自己的数据副本,而不会在组件实例之间共享。每次创建组件实例时,都会调用该函数,返回一个新的数据对象,这样每个实例都拥有独立的数据。
- 将