07 组件通信
组件通信
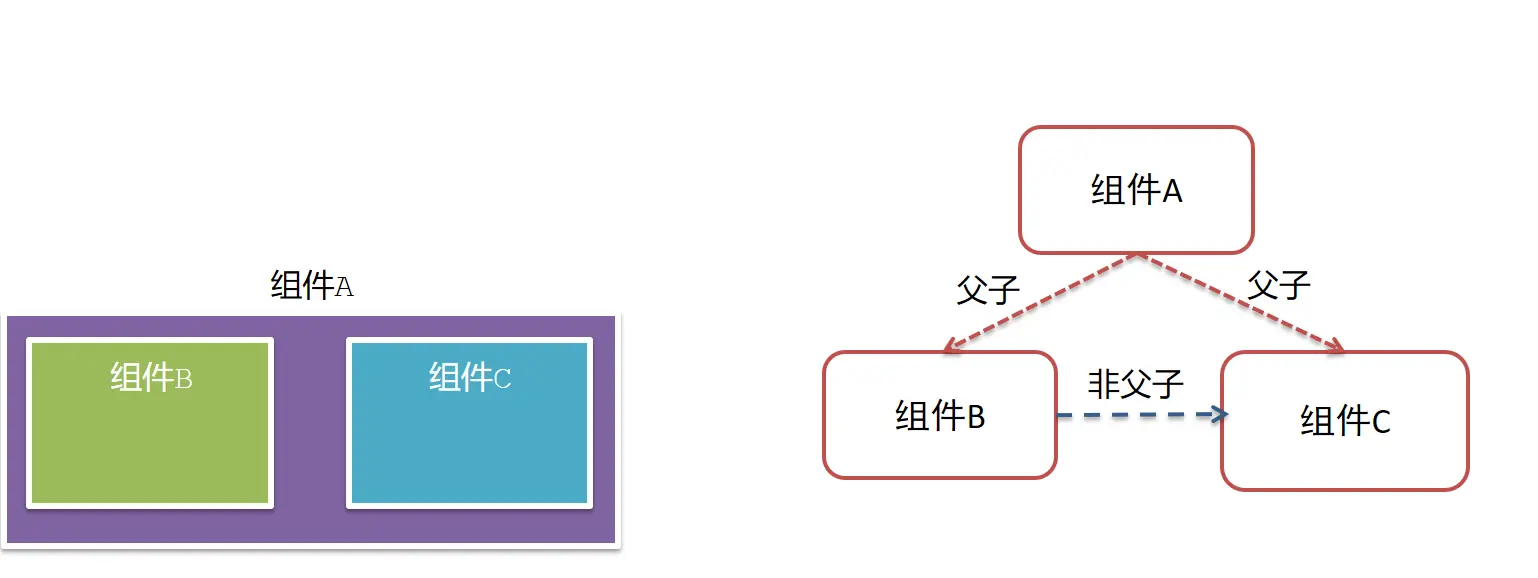
什么是组件通信
组件通信,就是指组件与组件之间的数据传递
- 组件的数据是独立的,无法直接访问其他组件的数据。
- 想使用其他组件的数据,就需要组件通信
组件关系分类
- 父子关系
- 非父子关系
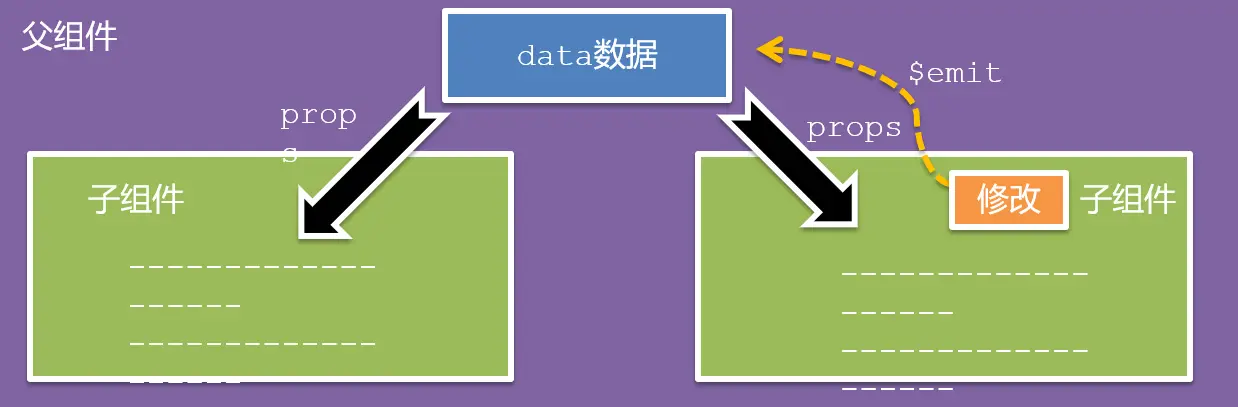
通信解决方案
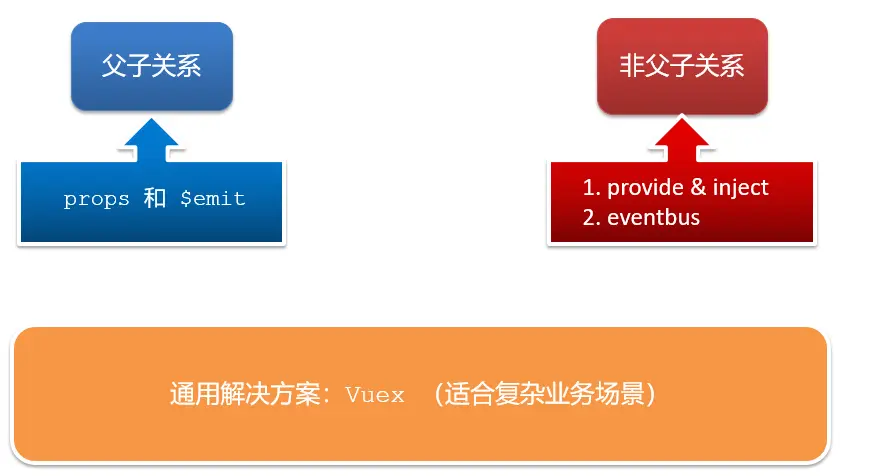
父子通信流程
- 父组件通过
props将数据传递给子组件 - 子组件利用
$emit通知父组件修改更新
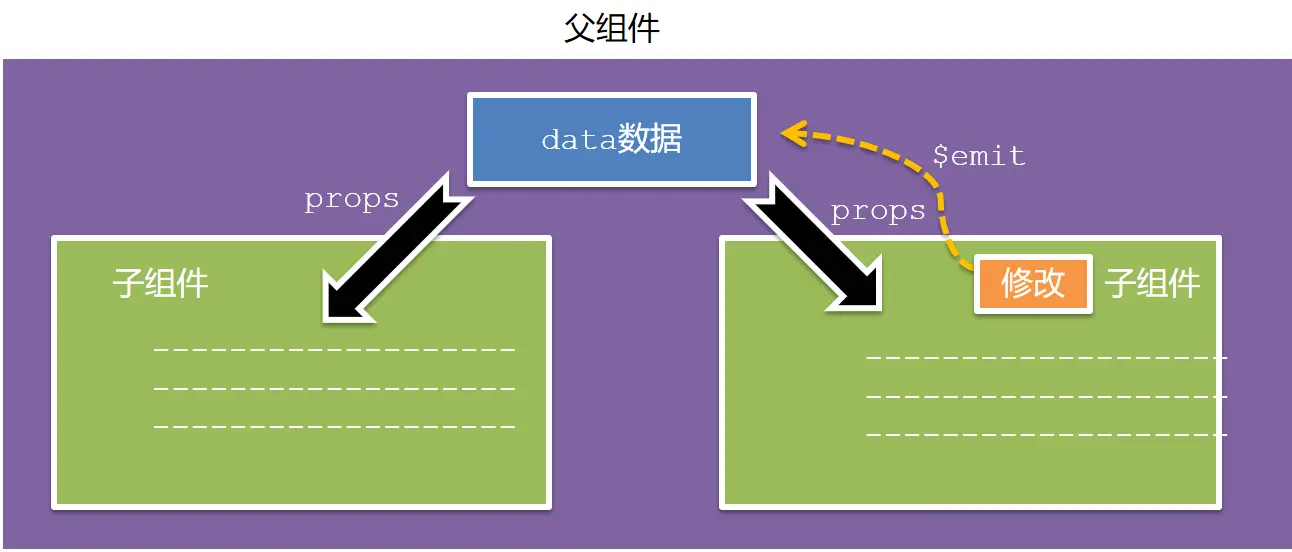
父向子传值步骤
父组件通过 props 将数据传递给子组件

- 给子组件以添加属性的方式传值
<Son :title="myTitle"></Son> - 子组件内部通过
props接收props: ["title"], - 模板中直接使用
props接收的值
vue
<script>
// 父向子传值
// 1. 给组件标签,添加属性方式 赋值
// 2. 子组件中,通过 props 接收
// 3. 模板中直接使用 props 的值

export default {
  name: 'Son-child',
  // 2. 子组件中,通过 props 接收
  props: ['title'],
}
</script>

<template>
  <div class="son">
    <!-- 3. 模板中直接使用 props 的值 -->
    我是 Son 组件
    <span class="title">{{ title }}</span>
  </div>
</template>

<style lang="css" scoped>
  .son {
    width: 300px;
    border: 3px solid #000;
    margin: 10px;
  }

  .title {
    background-color: pink;
  }
</style>vue
<template>
  <div class="app">
    我是 APP 组件 (父组件)
    <!-- 1. 给组件标签,添加属性方式 赋值 -->
    <Son :title="myTitle"></Son>
  </div>
</template>

<script>
import Son from './components/Son'

// 父向子传值
// 1. 给组件标签,添加属性方式 赋值
// 2. 子组件中,通过 props 接收
// 3. 模板中直接使用 props 的值

export default {
  name: 'App',
  components: {
    Son,
  },
  data () {
    return {
      myTitle: '我是父组件的标题',
    }
  },
}
</script>

<style lang="css" scoped>
  div {
    width: 350px;
    border: 3px solid #000;
    margin: 10px;
  }
</style>js
import Vue from 'vue'
import App from './App.vue'

Vue.config.productionTip = false

new Vue({
  render: h => h(App),
}).$mount('#app')子向父传值步骤
子组件利用 $emit 通知父组件修改更新
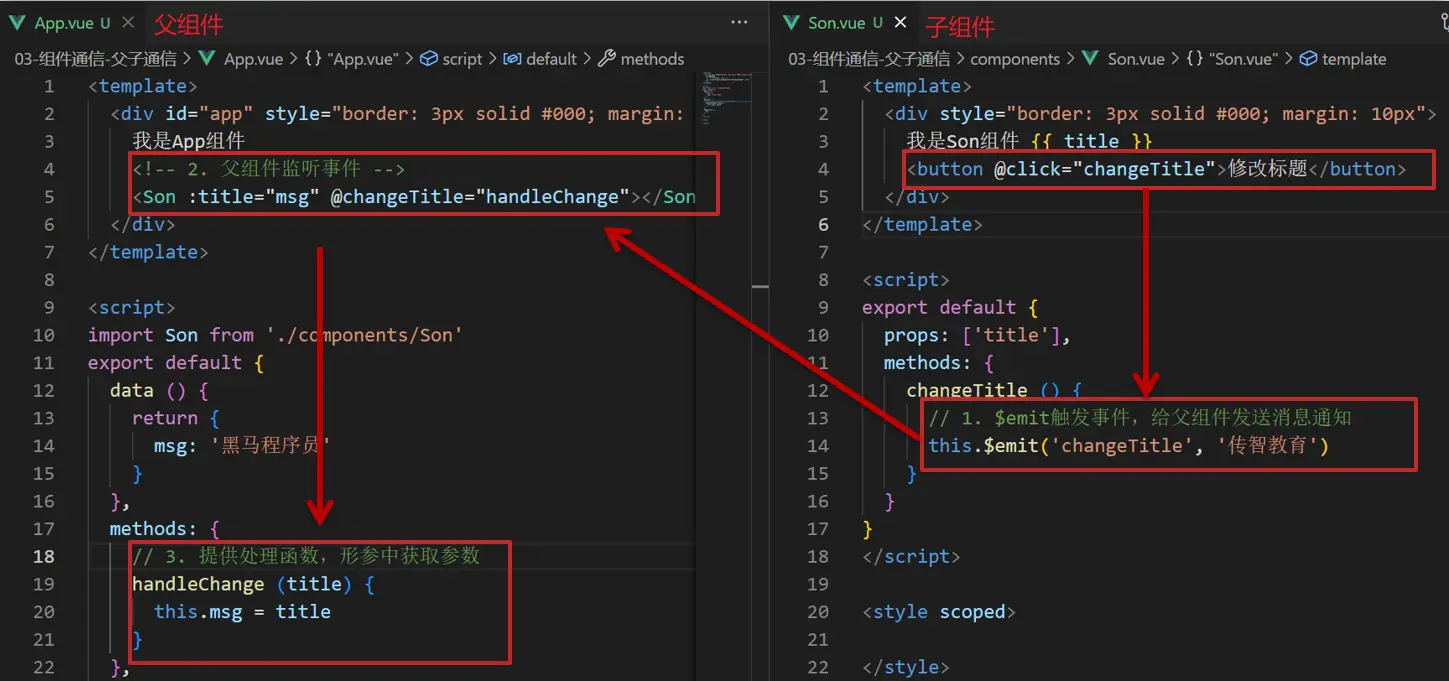
$emit触发事件,给父组件发送消息通知$emit('sonEvent', '我是子组件的数据')- 父组件监听
$emit触发的事件<Son :title="myTitle" @sonEvent="handleSonEvent"></Son> - 提供处理函数,在函数的性参中获取传过来的参数
handleSonEvent(data)
vue
<script>
// 子向父传值
// 1. 子组件中,通过 $emit 触发自定义事件 (例如事件名称为 sonEvent),同时传递数据给父组件
// 2. 父组件中,通过 v-on(@) 绑定自定义事件 (事件名为 sonEvent) 和事件处理函数
// 3. 在 methods 中定义事件的处理函数

export default {
  name: 'Son-child',
  props: ['title'],
}
</script>

<template>
  <div class="son">
    我是 Son 组件
    <span class="title">{{ title }}</span>
    <!-- 1. 子组件中,通过 $emit 触发自定义事件 (例如事件名称为 sonEvent),同时传递数据给父组件 -->
    <!-- 这里的 sonEvent 是自定义事件名,在父组件中,通过 v-on(@) 绑定 -->
    <button @click="$emit('sonEvent', '我是子组件的数据')">修改父组件的数据 title</button>
  </div>
</template>

<style lang="css" scoped>
  .son {
    width: 300px;
    border: 3px solid #000;
    margin: 10px;
  }

  .title {
    background-color: pink;
  }
</style>vue
<template>
  <div class="app">
    我是 APP 组件 (父组件)
    <!-- 2. 父组件中,通过 v-on(@) 绑定自定义事件 (事件名为 sonEvent) 和事件处理函数 -->
    <Son :title="myTitle" @sonEvent="handleSonEvent"></Son>
  </div>
</template>

<script>
import Son from './components/Son'

// 子向父传值
// 1. 子组件中,通过 $emit 触发自定义事件 (例如事件名称为 sonEvent),同时传递数据给父组件
// 2. 父组件中,通过 v-on(@) 绑定自定义事件 (事件名为 sonEvent) 和事件处理函数
// 3. 在 methods 中定义事件的处理函数

export default {
  name: 'App',
  components: {
    Son,
  },
  data () {
    return {
      myTitle: '我是父组件的标题',
    }
  },
  methods: {
    // 3. 在 methods 中定义事件的处理函数
    handleSonEvent (data) {
      console.log('父组件中,接收到子组件的数据', data)
      this.myTitle = data
    },
  },
}
</script>

<style lang="css" scoped>
  div {
    width: 350px;
    border: 3px solid #000;
    margin: 10px;
  }
</style>js
import Vue from 'vue'
import App from './App.vue'

Vue.config.productionTip = false

new Vue({
  render: h => h(App),
}).$mount('#app')总结
组件关系分类有哪两种
- 父子关系
- 非父子关系
父子组件通信的流程是什么?
父向子
- 给子组件以添加属性的方式传值
<Son :title="myTitle"></Son> - 子组件内部通过
props接收props: ["title"], - 模板中直接使用
props接收的值
- 给子组件以添加属性的方式传值
子向父
$emit触发事件,给父组件发送消息通知$emit('sonEvent', '我是子组件的数据')- 父组件监听
$emit触发的事件<Son :title="myTitle" @sonEvent="handleSonEvent"></Son> - 提供处理函数,在函数的性参中获取传过来的参数
handleSonEvent(data)
props 接收数据
Props 定义
组件上 注册的一些 自定义属性
类型:
Array<string> | Object详细:props 可以是数组或对象,用于接收来自父组件的数据。props 可以是简单的数组,或者使用对象作为替代,对象允许配置高级选项,如类型检测、自定义验证和设置默认值。
你可以基于对象的语法使用以下选项:
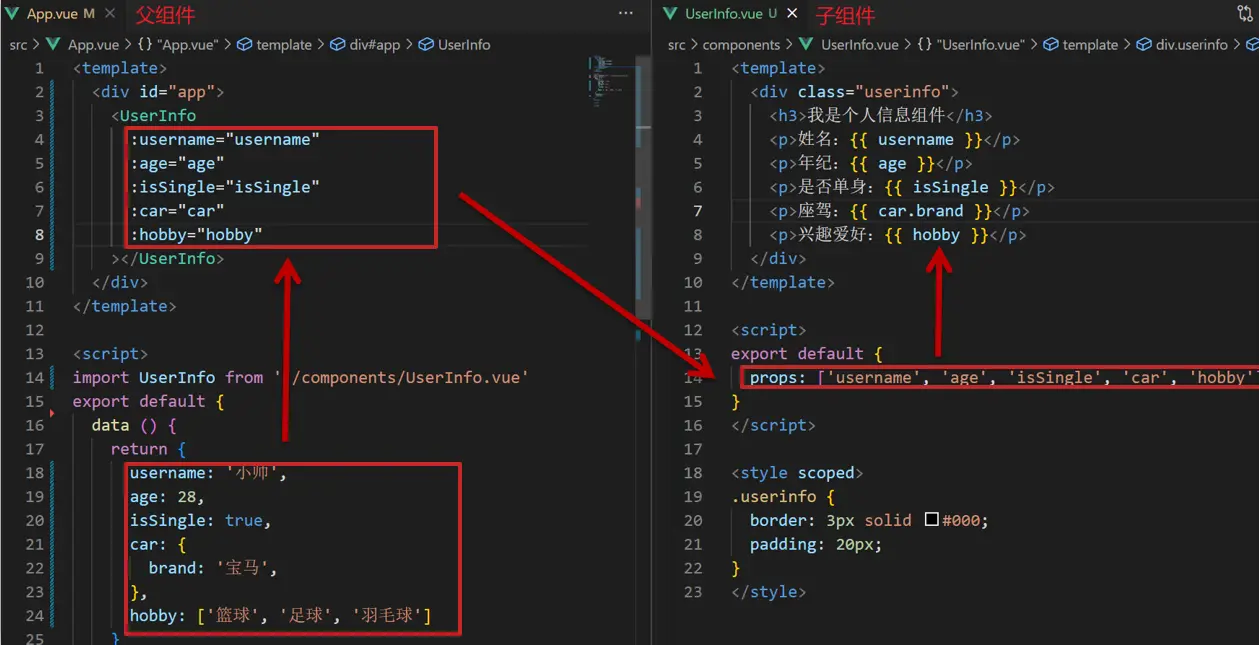
type:可以是下列原生构造函数中的一种:String、Number、Boolean、Array、Object、Date、Function、Symbol、任何自定义构造函数、或上述内容组成的数组。会检查一个 prop 是否是给定的类型,否则抛出警告。Prop 类型的 更多信息在此。default:any为该 prop 指定一个默认值。如果该 prop 没有被传入,则换做用这个值。对象或数组的默认值必须从一个工厂函数返回。required:Boolean定义该 prop 是否是必填项。在非生产环境中,如果这个值为 truthy 且该 prop 没有被传入的,则一个控制台警告将会被抛出。validator:Function自定义验证函数会将该 prop 的值作为唯一的参数代入。在非生产环境下,如果该函数返回一个 falsy 的值 (也就是验证失败),一个控制台警告将会被抛出。你可以在 这里 查阅更多 prop 验证的相关信息。
Props 作用
- 向子组件传递数据
特点
- 可以 传递 任意数量 的 prop
- 可以 传递 任意类型 的 prop
vue
<template>
  <div>
    <form>
      <label for="username">用户名:</label>
      <!-- <input type="text" id="username" :value="username" @input="updateUsername" /> -->
      <input type="text" id="username" v-model="uname" />
      <br /><br />

      <label for="age">年龄:</label>
      <input type="number" :value="age" @input="updateAge" />
      <br /><br />

      <label for="isSingle">单身:</label>
      <input type="checkbox" id="isSingle" :checked="isSingle" @change="updateIsSingle" />
      <br /><br />

      <label for="carBrand">汽车品牌:</label>
      <label v-for="(brand, index) in ['比亚迪', '特斯拉', '宝马', '大众', '保时捷']" :key="index">
        <input type="radio" :value="brand" v-model="selectedCarBrand" />
        {{ brand }}
      </label>
      <br /><br />

      <label for="hobbies">爱好:</label>
      <label v-for="(h, index) in ['篮球', '足球', '羽毛球', '乒乓球', '台球', '游泳']" :key="index">
        <input type="checkbox" :value="h" v-model="selectedHobbies" />
        {{ h }}
      </label>
    </form>
  </div>
</template>

<script>
export default {
  props: {
    username: String,
    age: Number,
    isSingle: Boolean,
    car: Object,
    hobby: Array,
  },
  data () {
    return {
      uname: this.username,
      selectedCarBrand: this.car.brand,
      selectedHobbies: [...this.hobby],
    }
  },
  watch: {
    // 监听传递的 car.brand 的变化,更新 selectedCarBrand
    'car.brand' (newBrand) {
      this.selectedCarBrand = newBrand
    },
    // 监听传递的 hobby 的变化,更新 selectedHobbies
    hobby (newHobby) {
      this.selectedHobbies = [...newHobby]
    },
  },
  methods: {
    // updateUsername(event) {
    //   this.$emit("update:username", event.target.value);
    // },
    updateAge (event) {
      this.$emit('update:age', event.target.value)
    },
    updateIsSingle (event) {
      this.$emit('update:isSingle', event.target.checked)
    },
    updateCarBrand (event) {
      // 如果 car 是对象,需要创建一个新对象以触发变化
      const newCar = { ...this.car, brand: event.target.value }
      this.$emit('update:car', newCar)
    },
  },
}
</script>vue
<template>
  <div id="app">
    <UserInfo
      :username="userInfo.username"
      :age="userInfo.age"
      :isSingle="userInfo.isSingle"
      :car="userInfo.car"
      :hobby="userInfo.hobby" />
  </div>
</template>

<script>
import UserInfo from './components/UserInfo.vue'

export default {
  components: {
    UserInfo,
  },
  data () {
    return {
      userInfo: {
        username: '小猪佩奇',
        age: 12,
        isSingle: false,
        car: {
          brand: '宝马',
        },
        hobby: ['篮球', '足球', '羽毛球'],
      },
    }
  },
}
</script>js
import Vue from 'vue'
import App from './App.vue'

Vue.config.productionTip = false

new Vue({
  render: h => h(App),
}).$mount('#app')props 校验
- 组件的 props 可以乱传吗?当然不行
作用
- 为组件的 prop 指定验证要求,不符合要求,控制台就会有错误提示 → 从而帮助开发者,快速发现错误
语法
- 类型校验
type→String、Number、Boolean、Array、Object、Date、Function、Symbol、任何自定义构造函数、或上述内容组成的数组 - 非空校验
required→Boolean。在非生产环境中,如果这个值为 truthy 且该 prop 没有被传入的,则一个控制台警告将会被抛出。 - 默认值
default→ 当父组件没有传递数据时,使用默认值 - 自定义校验
validator→ 返回true表示校验通过,返回false表示校验失败
vue
<template>
  <div class="base-progress">
    <div class="inner" :style="{ width: w + '%' }">
      <span>{{ w }}%</span>
    </div>
    <button @click="$emit('changeWidth', 'abc')">改变 width 为 abc</button>
    <!-- 修改后浏览器会给出 warn -->
    <!-- [Vue warn]: Invalid prop: type check failed for prop "w". Expected Number with value NaN, got String with value "abc". -->
    <!-- Vue.js 给出的警告,表示在组件中传递了一个无效的属性。属性 "w" 期望的类型是数字(Number),但实际传递的值是字符串 "abc" -->
  </div>
</template>

<script>
export default {
  props: {
    w: Number,
  },
}
</script>

<style scoped>
  .base-progress {
    height: 26px;
    width: 400px;
    border-radius: 15px;
    background-color: #272425;
    border: 3px solid #272425;
    box-sizing: border-box;
    margin-bottom: 30px;
  }
  .inner {
    position: relative;
    background: #379bff;
    border-radius: 15px;
    height: 25px;
    box-sizing: border-box;
    left: -3px;
    top: -2px;
  }
  .inner span {
    position: absolute;
    right: 0;
    top: 26px;
  }

  button {
    margin-top: 10px;
  }
</style>vue
<template>
  <div class="app">
    <BaseProgress :w="width" @changeWidth="handleChangeWidth"></BaseProgress>
  </div>
</template>

<script>
import BaseProgress from './components/BaseProgress.vue'
export default {
  data () {
    return {
      width: 66,
    }
  },
  components: {
    BaseProgress,
  },
  methods: {
    handleChangeWidth (newWidth) {
      this.width = newWidth
    },
  },
}
</script>

<style></style>js
import Vue from 'vue'
import App from './App.vue'

Vue.config.productionTip = false

new Vue({
  render: h => h(App),
}).$mount('#app')props 校验完整写法
语法
js
props: {
  校验的属性名:{
    type: 类型, // Number String Boolean ...
    required: true, // 是否必填
    default: 默认值,// 默认值
    validator (value) {
      // 自定义校验逻辑
      return 是否通过校验
    }
  }
},注意
default和required一般不同时写(因为当时必填项时,肯定是有值的)default后面如果是简单类型的值,可以直接写默认。如果是复杂类型的值,则需要以函数的形式return一个默认值
vue
<template>
  <div class="base-progress">
    <div class="inner" :style="{ width: w + '%' }">
      <span>{{ w }}%</span>
    </div>
    <button @click="$emit('changeWidth', 'abc')">改变 width 为 abc</button>
    <!-- 修改后浏览器会给出 warn -->
    <!-- [Vue warn]: Invalid prop: type check failed for prop "w". Expected Number with value NaN, got String with value "abc". -->
    <!-- Vue.js 给出的警告,表示在组件中传递了一个无效的属性。属性 "w" 期望的类型是数字(Number),但实际传递的值是字符串 "abc" -->
  </div>
</template>

<script>
export default {
  // 1.基础写法(类型校验)
  // props: {
  //   w: Number,
  // },
  // 2.完整写法(类型、默认值、非空、自定义校验)
  props: {
    w: {
      type: Number, // 类型校验
      required: true, // 非空校验
      default: 88, // 默认值
      validator (val) {
        // 自定义校验
        // console.log(val)
        if (val >= 100 || val <= 0) {
          console.error('传入的范围必须是 0-100 之间')
          return false
        } else {
          return true
        }
      },
    },
  },
}
</script>

<style scoped>
  .base-progress {
    height: 26px;
    width: 400px;
    border-radius: 15px;
    background-color: #272425;
    border: 3px solid #272425;
    box-sizing: border-box;
    margin-bottom: 30px;
  }
  .inner {
    position: relative;
    background: #379bff;
    border-radius: 15px;
    height: 25px;
    box-sizing: border-box;
    left: -3px;
    top: -2px;
  }
  .inner span {
    position: absolute;
    right: 0;
    top: 26px;
  }

  button {
    margin-top: 10px;
  }
</style>vue
<template>
  <div class="app">
    <BaseProgress :w="width" @changeWidth="handleChangeWidth"></BaseProgress>
  </div>
</template>

<script>
import BaseProgress from './components/BaseProgress.vue'
export default {
  data () {
    return {
      width: 60,
    }
  },
  components: {
    BaseProgress,
  },
  methods: {
    handleChangeWidth (newWidth) {
      this.width = newWidth
    },
  },
}
</script>

<style></style>js
import Vue from 'vue'
import App from './App.vue'

Vue.config.productionTip = false

new Vue({
  render: h => h(App),
}).$mount('#app')props vs data
共同点
- 都可以给组件提供数据
区别
- data 的数据是自己的 → 随便改
- prop 的数据是外部的 → 不能直接改,要遵循 单向数据流
单向数据流
- 父级 props 的数据更新,会向下流动,影响子组件。这个数据流动是单向的
口诀
谁的数据谁负责
vue
<template>
  <div class="base-count">
    <button @click="$emit('changeCount', count - 1)">-</button>
    <span>{{ count }}</span>
    <button @click="$emit('changeCount', count + 1)">+</button>
  </div>
</template>

<script>
export default {
  // 1.自己的数据随便修改(谁的数据 谁负责)
  // data () {
  //   return {
  //     count: 100,
  //   }
  // },
  // 2.外部传过来的数据 不能随便修改
  props: {
    count: {
      type: Number,
    },
  },
}
</script>

<style>
  .base-count {
    margin: 20px;
  }
</style>vue
<template>
  <div class="app">
    <BaseCount :count="count" @changeCount="handleChangeCount"></BaseCount>
  </div>
</template>

<script>
import BaseCount from './components/BaseCount.vue'
export default {
  components: {
    BaseCount,
  },
  data () {
    return {
      count: 100,
    }
  },
  methods: {
    handleChangeCount (val) {
      console.log(val)
      this.count = val
    },
  },
}
</script>

<style></style>js
import Vue from 'vue'
import App from './App.vue'

Vue.config.productionTip = false

new Vue({
  render: h => h(App),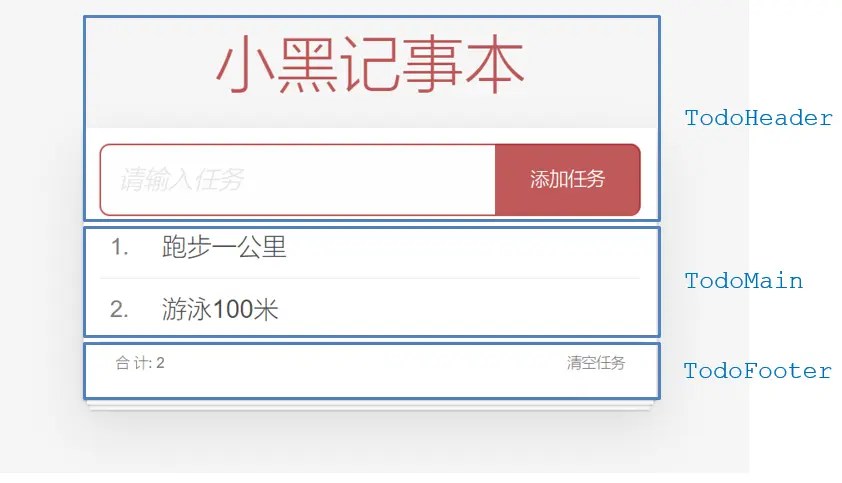
}).$mount('#app')案例 小黑记事本组件版
需求说明
- 拆分基础组件
- 渲染待办任务
- 添加任务
- 删除任务
- 底部合计 和 清空功能
- 持久化存储
拆分基础组件
- 咱们可以把小黑记事本原有的结构拆成三部分内容:头部
TodoHeader、列表TodoMain、底部TodoFooter
vue
<template>
  <!-- 主体区域 -->
  <section id="app">
    <TodoHeader></TodoHeader>
    <TodoMain></TodoMain>
    <TodoFooter></TodoFooter>
  </section>
</template>

<script>
  import TodoHeader from './components/TodoHeader.vue'
  import TodoMain from './components/TodoMain.vue'
  import TodoFooter from './components/TodoFooter.vue'

  export default {
    data() {
      return {}
    },
    components: {
      TodoHeader,
      TodoMain,
      TodoFooter,
    },
  }
</script>

<style scoped>
  #app {
    background: #fff;
    margin: 180px 0 40px 0;
    padding: 15px;
    position: relative;
    box-shadow: 0 2px 4px 0 rgba(0, 0, 0, 0.2), 0 25px 50px 0 rgba(0, 0, 0, 0.1);
  }
</style>渲染待办任务
- 提供数据:提供在公共的父组件 App.vue
- 通过父传子,将数据传递给 TodoMain
- 利用
v-for进行渲染
jsx
// 提供数据
const todoList = [
  { id: 1, name: '大保健' },
  { id: 2, name: '洗脚' },
  { id: 3, name: 'SPA' },
];

data() {
  return {
    list: todoList,
  };
},

// 通过父传子,将数据传递给 TodoMain
<TodoMain :list="list"></TodoMain>

// 通过 props 接收数据
// props: ['list'],
props: {
  list: {
    type: Array,
  },
},

// v-for 渲染
<li class="todo" v-for="(item, index) in list" :key="item.id">
  <div class="view">
    <span class="index">{{ index + 1 }}.</span>
    <label>{{ item.name }}</label>
    <button class="destroy"></button>
  </div>
</li>添加任务
- 收集表单数据
v-model - 监听事件(回车
input @keyup.enter+ 点击button @click都要进行添加) - 子传父,将任务名称传递给父组件 App.vue
- 父组件接受到数据后 进行添加 unshift/push(自己的数据自己负责)
jsx
// 收集表单数据
// 监听事件(回车 `input @keyup.enter` + 点击 `button @click` 都要进行添加)
<input placeholder="请输入任务" class="new-todo" v-model="todoName" @keyup.enter="addTodo" />
<button class="add" @click="addTodo">添加任务</button>
data() {
  return {
    todoName: '',
  };
},

// 子传父,将任务名称传递给父组件 App.vue
methods: {
  addTodo() {
    if (!this.todoName.trim()) {
      return;
    }
    this.$emit('addTodo', this.todoName.trim());
    this.todoName = '';
  },
},

// 父组件接受到数据后 进行添加 **unshift/push**
<TodoHeader @addTodo="handleAddTodo"></TodoHeader>
methods: {
  handleAddTodo(data) {
    console.log('handleAddTodo: ' + data);
    this.list.push({
      id: +new Date(),
      name: data,
    });
  },
},删除任务
- 监听事件(监听删除的点击)携带 id
- 子传父,将删除的 id 传递给父组件 App.vue
- 进行删除 filter (自己的数据自己负责)
jsx
// 监听事件(监听删除的点击)携带 id
// 子传父,将删除的 id 传递给父组件 App.vue
<button class="destroy" @click="$emit('delTodo', item.id)" ></button>

// 进行删除 **filter** (自己的数据自己负责)
<TodoMain :list="list" @delTodo="handelDelTodo"></TodoMain>
handelDelTodo(data) {
  console.log('handeldelTodo: ' + data);
  this.list = this.list.filter((item) => item.id !== data);
},底部合计
- 底部合计:父组件传递 list 到底部组件
- 底部组件接收数据后展示合计
list.length
jsx
// 底部合计:父组件传递 list 到底部组件
<TodoFooter :list="list"></TodoFooter>

// 底部组件接收数据后展示合计 `list.length`
props: {
  list: {
    type: Array,
  },
},
<span class="todo-count">
  合 计:<strong> {{ list.length }} </strong>
</span>清空功能
- 监听事件(监听清空任务的点击)
list中没有任务时 (list.length长度为 0),使用v-show指令隐藏底部统计和清空按钮- 子组件通知父组件
- 父组件清空
jsx
// 监听事件(监听清空任务的点击)
// 子组件通知父组件
<button class="clear-completed" @click="$emit('clearTodo')" >清空任务</button>

// list 中没有任务时 (list.length 长度为 0),使用 v-show 指令隐藏底部统计和清空按钮
<footer class="footer" v-show="list.length > 0">

// 父组件清空
<TodoFooter :list="list" @clearTodo="handelClearTodo"></TodoFooter>
handelClearTodo() {
  console.log('handelClearTodo!');
  this.list = [];
},持久化存储
watch监听数据变化- 持久化到本地
jsx
// `watch` 监听数据变化,持久化到本地
watch: {
  list: {
    handler(newVal) {
      console.log('list changed: ' + newVal);
      localStorage.setItem('todo-lists', JSON.stringify(newVal));
    },
    deep: true,
  },
},

// 页面加载时优先从 localStorage 中读取数据
data() {
  return {
    // list: todoList,
    list: JSON.parse(localStorage.getItem('todo-lists')) || todoList,
  };
},相关代码
vue
<script>
export default {
  name: 'TodoHeader',
  data () {
    return {
      todoName: '',
    }
  },
  methods: {
    addTodo () {
      if (!this.todoName.trim()) {
        return
      }
      this.$emit('addTodo', this.todoName.trim())
      this.todoName = ''
    },
  },
}
</script>

<template>
  <!-- 输入框 -->
  <header class="header">
    <h1>小黑记事本</h1>
    <input placeholder="请输入任务" class="new-todo" v-model="todoName" @keyup.enter="addTodo" />
    <button class="add" @click="addTodo">添加任务</button>
  </header>
</template>

<style scoped>
  #app .header input {
    border: 2px solid rgba(175, 47, 47, 0.8);
    border-radius: 10px;
  }
  #app .add {
    position: absolute;
    right: 15px;
    top: 15px;
    height: 68px;
    width: 140px;
    text-align: center;
    background-color: rgba(175, 47, 47, 0.8);
    color: #fff;
    cursor: pointer;
    font-size: 18px;
    border-radius: 0 10px 10px 0;
  }

  #app input::-webkit-input-placeholder {
    font-style: italic;
    font-weight: 300;
    color: #e6e6e6;
  }

  #app input::-moz-placeholder {
    font-style: italic;
    font-weight: 300;
    color: #e6e6e6;
  }

  #app input::input-placeholder {
    font-style: italic;
    font-weight: 300;
    color: gray;
  }

  #app h1 {
    position: absolute;
    top: -120px;
    width: 100%;
    left: 50%;
    transform: translateX(-50%);
    font-size: 60px;
    font-weight: 100;
    text-align: center;
    color: rgba(175, 47, 47, 0.8);
    -webkit-text-rendering: optimizeLegibility;
    -moz-text-rendering: optimizeLegibility;
    text-rendering: optimizeLegibility;
  }

  .new-todo,
  .edit {
    position: relative;
    margin: 0;
    width: 100%;
    font-size: 24px;
    font-family: inherit;
    font-weight: inherit;
    line-height: 1.4em;
    border: 0;
    color: inherit;
    padding: 6px;
    box-shadow: inset 0 -1px 5px 0 rgba(0, 0, 0, 0.2);
    box-sizing: border-box;
    -webkit-font-smoothing: antialiased;
    -moz-osx-font-smoothing: grayscale;
  }

  .new-todo {
    padding: 16px;
    border: none;
    background: rgba(0, 0, 0, 0.003);
    box-shadow: inset 0 -2px 1px rgba(0, 0, 0, 0.03);
  }
</style>vue
<template>
  <!-- 列表区域 -->
  <section class="main">
    <ul class="todo-list">
      <li class="todo" v-for="(item, index) in list" :key="item.id">
        <div class="view">
          <span class="index">{{ index + 1 }}.</span>
          <label>{{ item.name }}</label>
          <button class="destroy" @click="$emit('delTodo', item.id)"></button>
        </div>
      </li>
    </ul>
  </section>
</template>

<script>
export default {
  name: 'TodoMain',
  // props: ['list'],
  props: {
    list: {
      type: Array,
    },
  },
}
</script>

<style scoped>
.main {
  position: relative;
  z-index: 2;
}

.todo-list {
  margin: 0;
  padding: 0;
  list-style: none;
  overflow: hidden;
}

.todo-list li {
  position: relative;
  font-size: 24px;
  height: 60px;
  box-sizing: border-box;
  border-bottom: 1px solid #e6e6e6;
}

.todo-list li:last-child {
  border-bottom: none;
}

.todo-list .view .index {
  position: absolute;
  color: gray;
  left: 10px;
  top: 20px;
  font-size: 22px;
}

.todo-list li .toggle {
  text-align: center;
  width: 40px;
  /* auto, since non-WebKit browsers doesn't support input styling */
  height: auto;
  position: absolute;
  top: 0;
  bottom: 0;
  margin: auto 0;
  border: none; /* Mobile Safari */
  -webkit-appearance: none;
  appearance: none;
}

.todo-list li .toggle {
  opacity: 0;
}

.todo-list li .toggle + label {
  background-image: url('data:image/svg+xml;utf8,%3Csvg%20xmlns%3D%22http%3A//www.w3.org/2000/svg%22%20width%3D%2240%22%20height%3D%2240%22%20viewBox%3D%22-10%20-18%20100%20135%22%3E%3Ccircle%20cx%3D%2250%22%20cy%3D%2250%22%20r%3D%2250%22%20fill%3D%22none%22%20stroke%3D%22%23ededed%22%20stroke-width%3D%223%22/%3E%3C/svg%3E');
  background-repeat: no-repeat;
  background-position: center left;
}

.todo-list li .toggle:checked + label {
  background-image: url('data:image/svg+xml;utf8,%3Csvg%20xmlns%3D%22http%3A//www.w3.org/2000/svg%22%20width%3D%2240%22%20height%3D%2240%22%20viewBox%3D%22-10%20-18%20100%20135%22%3E%3Ccircle%20cx%3D%2250%22%20cy%3D%2250%22%20r%3D%2250%22%20fill%3D%22none%22%20stroke%3D%22%23bddad5%22%20stroke-width%3D%223%22/%3E%3Cpath%20fill%3D%22%235dc2af%22%20d%3D%22M72%2025L42%2071%2027%2056l-4%204%2020%2020%2034-52z%22/%3E%3C/svg%3E');
}

.todo-list li label {
  word-break: break-all;
  padding: 15px 15px 15px 60px;
  display: block;
  line-height: 1.2;
  transition: color 0.4s;
}

.todo-list li.completed label {
  color: #d9d9d9;
  text-decoration: line-through;
}

.todo-list li .destroy {
  display: none;
  position: absolute;
  top: 0;
  right: 10px;
  bottom: 0;
  width: 40px;
  height: 40px;
  margin: auto 0;
  font-size: 30px;
  color: #cc9a9a;
  margin-bottom: 11px;
  transition: color 0.2s ease-out;
}

.todo-list li .destroy:hover {
  color: #af5b5e;
}

.todo-list li .destroy:after {
  content: '×';
}

.todo-list li:hover .destroy {
  display: block;
}

.todo-list li .edit {
  display: none;
}

.todo-list li.editing:last-child {
  margin-bottom: -1px;
}

@media screen and (-webkit-min-device-pixel-ratio: 0) {
  .toggle-all,
  .todo-list li .toggle {
    background: none;
  }

  .todo-list li .toggle {
    height: 40px;
  }
}
</style>vue
<template>
  <!-- 统计和清空 -->
  <footer class="footer" v-show="list.length > 0">
    <!-- 统计 -->
    <span class="todo-count">
      合 计:<strong> {{ list.length }} </strong>
    </span>
    <!-- 清空 -->
    <button class="clear-completed" @click="$emit('clearTodo')">清空任务</button>
  </footer>
</template>

<script>
export default {
  name: 'TodoFooter',
  props: {
    list: {
      type: Array,
    },
  },
}
</script>

<style scoped>
.footer {
  color: #777;
  padding: 10px 15px;
  height: 20px;
  text-align: center;
  border-top: 1px solid #e6e6e6;
}

.footer:before {
  content: '';
  position: absolute;
  right: 0;
  bottom: 0;
  left: 0;
  height: 50px;
  overflow: hidden;
  box-shadow: 0 1px 1px rgba(0, 0, 0, 0.2), 0 8px 0 -3px #f6f6f6, 0 9px 1px -3px rgba(0, 0, 0, 0.2), 0 16px 0 -6px #f6f6f6, 0 17px 2px -6px rgba(0, 0, 0, 0.2);
}

.todo-count {
  float: left;
  text-align: left;
}

.todo-count strong {
  font-weight: 300;
}

.filters {
  margin: 0;
  padding: 0;
  list-style: none;
  position: absolute;
  right: 0;
  left: 0;
}

.filters li {
  display: inline;
}

.filters li a {
  color: inherit;
  margin: 3px;
  padding: 3px 7px;
  text-decoration: none;
  border: 1px solid transparent;
  border-radius: 3px;
}

.filters li a:hover {
  border-color: rgba(175, 47, 47, 0.1);
}

.filters li a.selected {
  border-color: rgba(175, 47, 47, 0.2);
}

.clear-completed,
html .clear-completed:active {
  float: right;
  position: relative;
  line-height: 20px;
  text-decoration: none;
  cursor: pointer;
}

.clear-completed:hover {
  text-decoration: underline;
}

.info {
  margin: 50px auto 0;
  color: #bfbfbf;
  font-size: 15px;
  text-shadow: 0 1px 0 rgba(255, 255, 255, 0.5);
  text-align: center;
}

.info p {
  line-height: 1;
}

.info a {
  color: inherit;
  text-decoration: none;
  font-weight: 400;
}

.info a:hover {
  text-decoration: underline;
}

@media (max-width: 430px) {
  .footer {
    height: 50px;
  }

  .filters {
    bottom: 10px;
  }
}
</style>vue
<template>
  <!-- 主体区域 -->
  <section id="app">
    <TodoHeader @addTodo="handleAddTodo"></TodoHeader>
    <TodoMain :list="list" @delTodo="handelDelTodo"></TodoMain>
    <TodoFooter :list="list" @clearTodo="handelClearTodo"></TodoFooter>
  </section>
</template>

<script>
import TodoHeader from './components/TodoHeader.vue'
import TodoMain from './components/TodoMain.vue'
import TodoFooter from './components/TodoFooter.vue'

const todoList = [
  { id: 1, name: '大保健' },
  { id: 2, name: '学习 vue' },
  { id: 3, name: 'SPA' },
]

export default {
  data () {
    return {
      // list: todoList,
      list: JSON.parse(localStorage.getItem('todo-lists')) || todoList,
    }
  },
  components: {
    TodoHeader,
    TodoMain,
    TodoFooter,
  },
  methods: {
    handleAddTodo (data) {
      console.log('handleAddTodo: ' + data)
      this.list.push({
        id: +new Date(),
        name: data,
      })
    },
    handelDelTodo (data) {
      console.log('handelDelTodo: ' + data)
      this.list = this.list.filter((item) => item.id !== data)
    },
    handelClearTodo () {
      console.log('handelClearTodo!')
      this.list = []
    },
  },
  watch: {
    list: {
      handler (newVal) {
        console.log('list changed: ' + newVal)
        localStorage.setItem('todo-lists', JSON.stringify(newVal))
      },
      deep: true,
    },
  },
}
</script>

<style scoped>
  #app {
    background: #fff;
    margin: 180px 0 40px 0;
    padding: 15px;
    position: relative;
    box-shadow: 0 2px 4px 0 rgba(0, 0, 0, 0.2), 0 25px 50px 0 rgba(0, 0, 0, 0.1);
  }
</style>js
import Vue from 'vue'
import App from './App.vue'

// import "./styles/index.css";
import './styles/common.css' // 通用样式

Vue.config.productionTip = false

new Vue({
  render: (h) => h(App),
}).$mount('#app')非父子通信
event bus 事件总线
- 非父子组件之间,进行简易消息传递。(复杂场景 → Vuex)
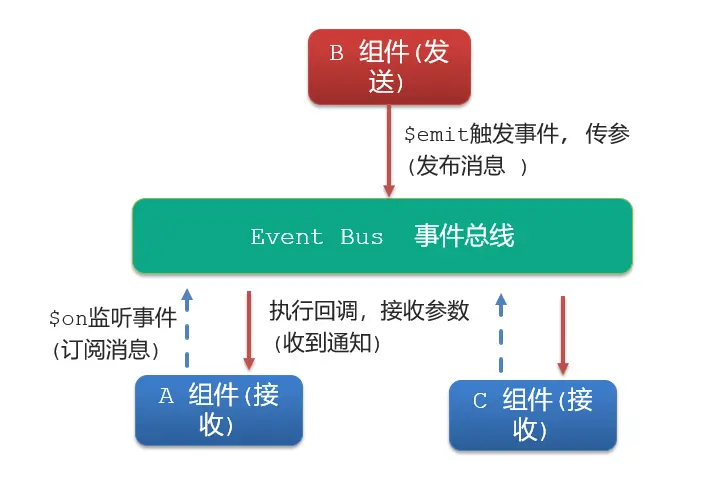
语法
创建一个都能访问的事件总线(空 Vue 实例)
jsimport Vue from 'vue' const Bus = new Vue() export default BusA 组件(接受方),监听 Bus 的
$on事件jscreated () { Bus.$on('sendMsg', (msg) => { this.msg = msg }) }B 组件(发送方),触发 Bus 的
$emit事件jsBus.$emit('sendMsg', '这是一个消息')
js
import Vue from 'vue'

// 创建一个空的 Vue 实例,作为事件总线 Event Bus
const Bus = new Vue()

// 将中央事件总线挂载到 Vue 原型上,这样每个组件都可以通过 this.$bus 访问到事件总线
export default Busvue
<template>
  <div class="base-a">
    <div>我是 A 组件(发送方)</div>
    <button @click="sendMsg">发送数据</button>
  </div>
</template>

<script>
import Bus from '../utils/EventBus'
export default {
  methods: {
    sendMsg () {
      Bus.$emit('sendMsg', '我是 A 组件发送的数据')
    },
  },
}
</script>

<style scoped>
  .base-a {
    width: 200px;
    height: 200px;
    border: 3px solid #000;
    border-radius: 3px;
    margin: 10px;
  }
</style>vue
<template>
  <div class="base-b">
    我是 B 组件(接受方)
    <p>
      <span>{{ msg }}</span>
    </p>
  </div>
</template>

<script>
import Bus from '../utils/EventBus'
export default {
  data () {
    return {
      msg: '',
    }
  },
  created () {
    Bus.$on('sendMsg', (data) => {
      this.msg = data
    })
  },
}
</script>

<style scoped>
  .base-b {
    width: 200px;
    height: 200px;
    border: 3px solid #000;
    border-radius: 3px;
    margin: 10px;
  }
  span {
    background-color: pink;
  }
</style>vue
<template>
  <div class="base-c">
    我是 C 组件(接受方)
    <p>
      <span>{{ msg }}</span>
    </p>
  </div>
</template>

<script>
import Bus from '../utils/EventBus'
export default {
  data () {
    return {
      msg: '',
    }
  },
  created () {
    Bus.$on('sendMsg', (data) => {
      this.msg = data
    })
  },
}
</script>

<style scoped>
  .base-c {
    width: 200px;
    height: 200px;
    border: 3px solid #000;
    border-radius: 3px;
    margin: 10px;
  }
  span {
    background-color: pink;
  }
</style>vue
<template>
  <div class="app">
    <BaseA></BaseA>
    <BaseB></BaseB>
    <BaseC></BaseC>
  </div>
</template>

<script>
import BaseA from './components/BaseA.vue'
import BaseB from './components/BaseB.vue'
import BaseC from './components/BaseC.vue'
export default {
  components: {
    BaseA,
    BaseB,
    BaseC,
  },
}
</script>

<style></style>js
import Vue from 'vue'
import App from './App.vue'

Vue.config.productionTip = false

new Vue({
  render: (h) => h(App),
}).$mount('#app')总结
非父子组件传值借助什么?
使用 Vuex(状态管理): Vuex 是 Vue.js 的状态管理库,它可以帮助管理应用的状态,并提供了一种在任何组件之间共享状态的方法。通过 Vuex,不同组件可以通过提交 mutations 来改变共享的状态,实现非父子组件之间的通信。
使用事件总线(Event Bus): 可以创建一个全局的事件总线实例,用于在不同组件之间发布和订阅事件。一个组件可以在事件总线上发布一个事件,而其他组件可以监听并响应这个事件。这样就可以实现非父子组件之间的通信。
javascript// 创建事件总线 const EventBus = new Vue() // 在组件 A 中发布事件 EventBus.$emit('custom-event', data) // 在组件 B 中监听事件 EventBus.$on('custom-event', (data) => { // 处理收到的数据 })使用 provide / inject: 在父组件中使用
provide提供数据,然后在子组件中使用inject注入数据。这样可以实现在组件树中任意深度的组件之间的数据传递。javascript// 在父组件中 provide 数据 provide() { return { sharedData: this.sharedData }; } // 在子组件中 inject 数据 inject: ['sharedData']
什么是事件总线
- 非父子组件之间,进行简易消息传递。
发送方应该调用事件总线的哪个方法
- 触发 Bus 的
$emit事件
- 触发 Bus 的
接收方应该调用事件总线的哪个方法
- 监听 Bus 的
$on事件
- 监听 Bus 的
一个组件发送数据,可不可以被多个组件接收
- 一个组件发送的事件可以被多个组件接收。监听 Bus 的
$on事件即可。 - 事件总线是一个全局的 Vue 实例,因此任何组件都可以通过该实例进行事件的发布和订阅。
- 一个组件发送的事件可以被多个组件接收。监听 Bus 的
provide & inject
- 跨层级共享数据
- 这对选项需要一起使用,以允许一个祖先组件向其所有子孙后代注入一个依赖,不论组件层次有多深,并在其上下游关系成立的时间里始终生效。

语法
父组件 provide 提供数据
jsexport default { provide() { return { // 普通类型【非响应式】 color: this.color, // 复杂类型【响应式】 userInfo: this.userInfo, } }, }子/孙组件 inject 获取数据
jsexport default { inject: ['color', 'userInfo'], created() { console.log(this.color, this.userInfo) }, }
vue
<template>
  <div class="SonA">我是 SonA 组件
    <GrandSon></GrandSon>
  </div>
</template>

<script>
import GrandSon from '../components/GrandSon.vue'
export default {
  components: {
    GrandSon,
  },
}
</script>

<style>
.SonA {
  border: 3px solid #000;
  border-radius: 6px;
  margin: 10px;
  height: 200px;
}
</style>vue
<template>
  <div class="SonB">我是 SonB 组件</div>
</template>

<script>
export default {}
</script>

<style>
  .SonB {
    border: 3px solid #000;
    border-radius: 6px;
    margin: 10px;
    height: 200px;
  }
</style>vue
<template>
  <div class="grandSon">
    我是 GrandSon
    {{ color }} -{{ userInfo.name }} -{{ userInfo.age }}
  </div>
</template>

<script>
export default {
  inject: ['color', 'userInfo'],
  mounted () {
    console.log(this.color, this.userInfo)
    console.log(this.userInfo.name, this.userInfo.age)
  },
}
</script>

<style>
  .grandSon {
    border: 3px solid #000;
    border-radius: 6px;
    margin: 10px;
    height: 100px;
  }
</style>vue
<template>
  <div class="app">
    我是 APP 组件
    <button @click="change">修改数据</button>
    <SonA></SonA>
    <SonB></SonB>
  </div>
</template>

<script>
import SonA from './components/SonA.vue'
import SonB from './components/SonB.vue'
export default {
  provide () {
    return {
      // 简单类型 是非响应式的
      color: this.color,
      // 复杂类型 是响应式的
      userInfo: this.userInfo,
    }
  },
  data () {
    return {
      color: 'pink',
      userInfo: {
        name: 'zs',
        age: 18,
      },
    }
  },
  methods: {
    change () {
      this.color = 'red'
      this.userInfo.name = 'ls'
      this.userInfo.age = 20
    },
  },
  components: {
    SonA,
    SonB,
  },
}
</script>

<style>
  .app {
    border: 3px solid #000;
    border-radius: 6px;
    margin: 10px;
  }
</style>js
import Vue from 'vue'
import App from './App.vue'

Vue.config.productionTip = false

new Vue({
  render: (h) => h(App),
}).$mount('#app')注意
- provide 提供的简单类型的数据不是响应式的,复杂类型数据是响应式。(推荐提供复杂类型数据)
- 子/孙组件通过 inject 获取的数据,不能在自身组件内修改